There’s something truly magical about Easter treats that bring back childhood memories of hunting for those colorful eggs hidden in the grass, the thrill of discovering sweet surprises, and the joy of sharing goodies with loved ones. If you’re looking to add a little nostalgic charm to your Easter celebrations without spending hours in the kitchen, these Easter Egg Oreo Balls are exactly what you need. They’re quick, easy, and irresistibly delicious — a perfect combination for a springtime dessert that will have everyone asking for seconds.
What I love most about these Oreo balls is how effortlessly they come together. You don’t need to bake anything, and with just a few simple ingredients, you can create beautiful little egg-shaped treats that look as delightful as they taste. Whether you’re making them with kids, gifting them to friends, or just indulging yourself, these no-bake sweets are a fantastic way to celebrate the season.
Why You’ll Love Easter Egg Oreo Balls
- Fast: From start to finish, these take less than an hour, including chilling time.
- Easy: No baking or complicated steps—just mixing, shaping, and dipping.
- Giftable: Their charming pastel colors and festive shapes make them perfect for gifting.
- Crowd-pleasing: Oreo lovers and candy fans alike will rave over these sweet bites.
Ingredients
Let’s talk about what you’ll need to bring these Easter Egg Oreo Balls to life. The ingredients are straightforward, but each plays a key role in making the perfect texture and flavor.
- 36 Oreo cookies: You’ll want to crush these into fine crumbs. The classic chocolate and cream combo is the base of this treat.
- 8 oz cream cheese, softened: This adds the creamy texture needed to bind the Oreo crumbs together and gives a slight tang that balances the sweetness.
- 16 oz candy melts, assorted pastel colors: These are what you’ll use to coat the eggs, giving them that smooth, shiny, and festive finish. I love choosing pastel pinks, blues, yellows, and greens to make them truly Easter-themed.
- Sprinkles, edible glitter, and decorations: This is where you can get creative and add your personal touch—anything from tiny pastel-colored sprinkles to edible glitter will make the eggs pop.
These ingredients are easy to find at most grocery stores, especially around Easter. If you want to explore more no-bake dessert options, you might enjoy my No-Bake Peanut Butter Pie, which is another quick and creamy delight perfect for any occasion.
How to Make Easter Egg Oreo Balls
Making these Easter Egg Oreo Balls is a breeze, and I’m here to walk you through every step. Grab your favorite apron and let’s get started!
- Crush the Oreos: Place your Oreo cookies in a food processor and pulse until they become fine crumbs. No food processor? No problem! Put them in a zip-top bag and crush with a rolling pin until you have a fine, sandy texture.
- Mix with cream cheese: Transfer the Oreo crumbs into a mixing bowl and add the softened cream cheese. Using a spatula or your hands, mix until the mixture is smooth and uniform. It should feel like dough and hold together when pressed.
- Shape into eggs: Scoop out small amounts of the mixture and roll them between your palms to form egg shapes. Don’t worry if they’re not perfect—you can always shape them a little more once chilled. Place them on a parchment-lined baking sheet.
- Freeze: Pop the baking sheet into the freezer for 20-30 minutes. This step firms up the balls, making them easier to dip in candy melts without falling apart.
- Melt the candy melts: In separate microwave-safe bowls, melt your pastel-colored candy melts according to package directions—usually 30-second bursts in the microwave, stirring in between until smooth.
- Dip and decorate: Using a fork or dipping tool, dip each Oreo egg into the melted candy melts, making sure it’s fully coated. Gently tap off excess coating and place back on parchment. While still wet, sprinkle with your choice of decorations like sprinkles or edible glitter. You can even drizzle contrasting colors of candy melts over the eggs for a pretty effect.
- Set: Let the eggs sit at room temperature or chill in the refrigerator until the candy coating is firm. This usually takes about 15-20 minutes.
And voilà! You now have adorable, delicious Easter Egg Oreo Balls ready to enjoy. If you’re interested in more festive no-bake treats, be sure to check out my No-Bake Brownie Cheesecake Cups for another crowd-pleasing dessert.

Substitutions & Additions
One of the best things about this recipe is how flexible it is. Feel free to make it your own with some fun substitutions or additions that suit your taste or dietary needs.
- Cookie swaps: Instead of classic Oreos, try chocolate sandwich cookies with different fillings like mint or peanut butter for a twist.
- Flavor the cream cheese: Add a teaspoon of vanilla extract or a pinch of cinnamon to the cream cheese mixture for extra flavor depth.
- Use white chocolate: If candy melts aren’t your favorite, you can melt white chocolate and tint it with food coloring to get those pastel shades.
- Add mix-ins: Stir in mini chocolate chips, crushed nuts, or even tiny candy pieces into the Oreo-cream cheese mixture for a fun surprise inside.
- Decorate creatively: Use edible markers to draw cute designs, or pipe small details with colored candy melts to make your eggs extra special.
Personally, I love experimenting with different coatings and decorations, especially around the holidays. It reminds me a bit of the fun I had making those intricate Easter cookies growing up—if you want to try your hand at festive baking, my Easter Cookie Cake is a delightful project too!
Tips for Success
If you want your Easter Egg Oreo Balls to come out perfectly every time, here are some tips I’ve learned through trial and error that really help:
- Crush finely: The finer your Oreo crumbs, the smoother your mixture will be and the easier it will be to shape those cute eggs.
- Softened cream cheese: Make sure your cream cheese is soft but not melted. Room temperature for about 30 minutes usually does the trick.
- Chill well: Don’t skip the freezing step before dipping. It prevents the eggs from falling apart when coated.
- Dip gently: Use a fork or dipping tool to cover the eggs evenly and tap off excess candy melt so your coating isn’t too thick or messy.
- Work quickly: Candy melts can harden fast, so prepare your decorating station in advance to decorate while the coating is still wet.
- Prep ahead: These Oreo balls can be made a day or two in advance and stored in the fridge or freezer, making them a fantastic make-ahead dessert for busy holiday weekends.
For more quick and easy no-bake recipes that you can prepare ahead of time, take a peek at my No-Bake Brownie Batter Dip. It’s a total crowd-pleaser and just as fuss-free as these Oreo balls.
How to Store Easter Egg Oreo Balls
Storing your Easter Egg Oreo Balls properly will keep them fresh, delicious, and ready to impress whenever you’re ready to serve.
Refrigeration: Store the Oreo balls in an airtight container in the fridge. They will keep well for up to one week. The candy coating will stay firm, and the inside will remain creamy and smooth.
Freezing: If you want to make a big batch ahead of time, you can freeze them. Place the coated eggs in a single layer on a baking sheet until frozen solid, then transfer to a freezer-safe container or bag. They’ll keep for up to 2 months. When ready to enjoy, thaw in the refrigerator for a few hours before serving.
Just a heads-up: if you do freeze them, the candy coating might develop a slight bloom (a whitish film), but it won’t affect the taste, and you can still enjoy the treat with no problem!
FAQs
Q: Can I use regular chocolate instead of candy melts?
A: Yes! You can use white chocolate or milk chocolate and tint it with food coloring if you want the pastel look. Just be sure to temper the chocolate properly for a smooth finish.
Q: How big should I make each Oreo ball?
A: About 1 to 1.5 inches long works well for the egg shape — easy to handle and perfect for snacking.
Q: Can I make these vegan or dairy-free?
A: Absolutely! Use dairy-free cream cheese and vegan-friendly cookies and candy melts. Just check the labels to be sure.
Q: How do I prevent the candy coating from cracking?
A: Make sure the Oreo balls are chilled well before dipping, and don’t apply a coating that is too thick. Also, avoid sudden temperature changes when setting them.
Making these Easter Egg Oreo Balls is a wonderful way to add a personal, homemade touch to your holiday table. They capture the spirit of Easter with their playful shapes and pastel colors, but best of all, they’re a snap to make and a joy to share. If you love quick, no-fuss desserts, you’ll find lots of inspiration on Recettia, where I share a variety of recipes like the indulgent and easy-to-make Pineapple Cream Cheese Pound Cake, perfect for spring and summer gatherings.
So, are you ready to create these charming Easter Egg Oreo Balls and make your holiday celebrations extra sweet? Trust me, once you try them, they’ll become a new family favorite you’ll want to revisit year after year.
Don’t forget to follow me on Pinterest for more delicious recipes, fun kitchen ideas, and seasonal treats!
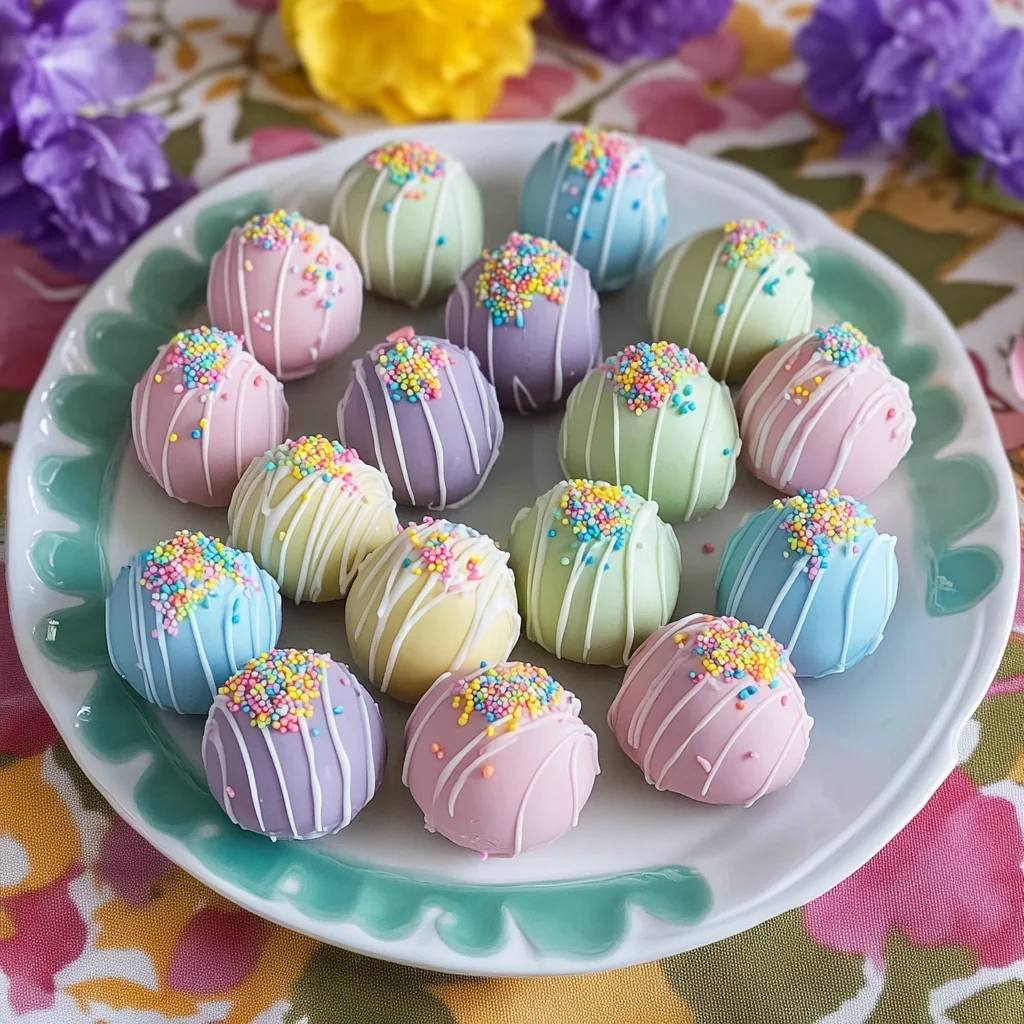
Delightful Easter Egg Oreo Balls
Ingredients
Equipment
Method
- Step 1: Crush the Oreo cookies into fine crumbs using a food processor or by placing them in a zip-top bag and crushing with a rolling pin until sandy in texture.
- Step 2: Mix the Oreo crumbs with softened cream cheese in a mixing bowl until smooth and uniform, forming a dough that holds together when pressed.
- Step 3: Scoop small amounts of the mixture and roll between palms to form egg shapes. Place on a parchment-lined baking sheet.
- Step 4: Freeze the shaped eggs for 20-30 minutes to firm up for easier dipping.
- Step 5: Melt the candy melts in microwave-safe bowls in 30-second bursts, stirring until smooth.
- Step 6: Dip each Oreo egg into the melted candy melts using a fork or dipping tool, tap off excess coating, and place back on parchment. Decorate with sprinkles or edible glitter while still wet.
- Step 7: Allow the coating to set at room temperature or chill in the refrigerator for 15-20 minutes until firm.