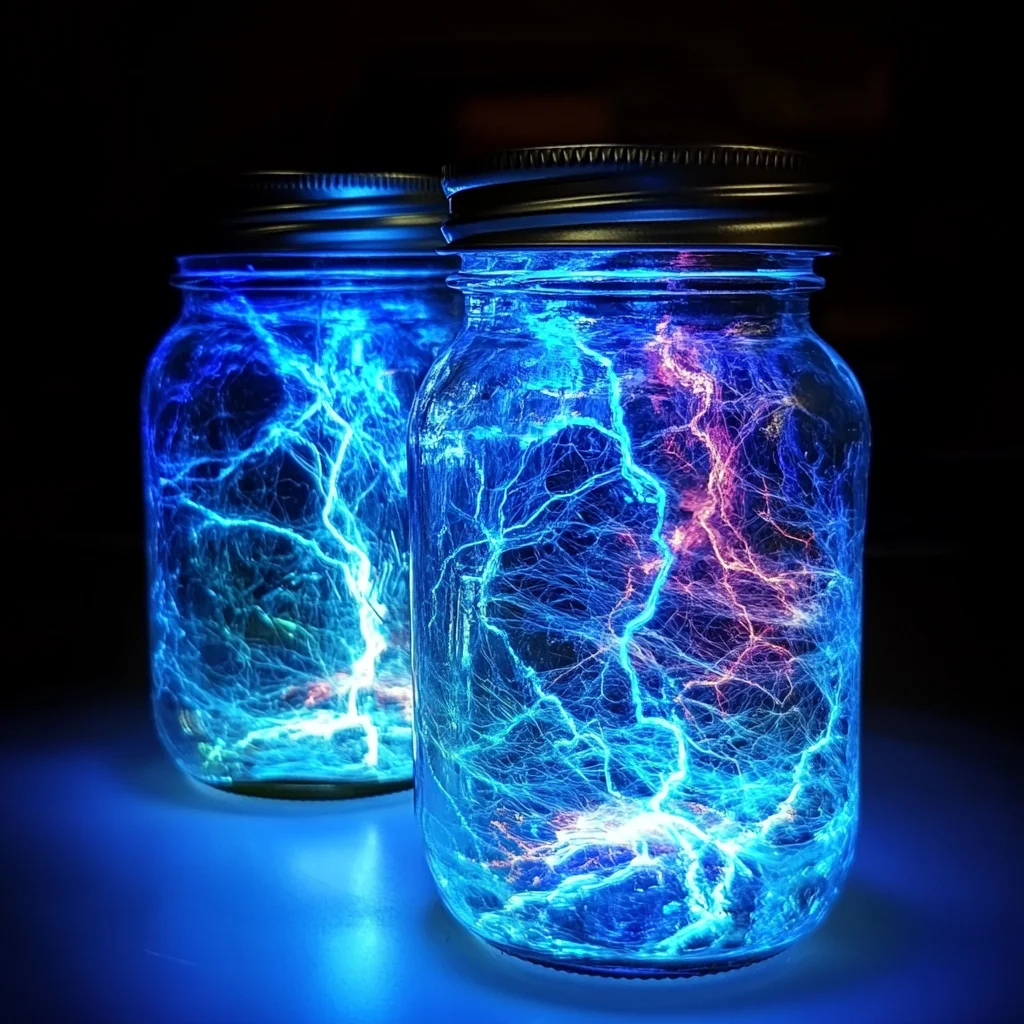
Remember those magical moments from childhood, gazing up at a starry night or watching a mesmerizing lava lamp? There’s something truly enchanting about light and motion, isn’t there? Well, today, my friend, I’m going to show you how to capture a little bit of that wonder right in your kitchen with a project that’s so easy, so quick, and so incredibly memorable, you’ll want to make a whole galaxy of them! Get ready to create your very own Electrified Thunder Glow Jars – a stunning, glowing spectacle that looks like a miniature lightning storm trapped in a bottle. This isn’t just a recipe; it’s an experience, perfect for a cozy night in or a dazzling party accent.
Why You’ll Love Electrified Thunder Glow Jars
- Fast: Whip one up in minutes!
- Easy: No special skills required, just follow along.
- Giftable: A unique, handmade present for any occasion.
- Crowd-pleasing: Kids and adults alike will be absolutely mesmerized!
Ingredients
Gathering your supplies for these glowing wonders is a breeze. Most of these you might even have lying around the house!
- 1 clear glass jar with lid: Mason jars, old jam jars, or even a fancy glass bottle work perfectly. The clearer, the better for that vibrant glow!
- 1/2 cup water: Just good old tap water will do.
- 1/2 cup vegetable oil (or baby oil for clarity): Vegetable oil works great, but if you want that extra crystal-clear look, baby oil gives a fantastic effect.
- A few drops of blue or purple food coloring: These colors really pop and give that thunderous, electric vibe. Feel free to experiment with other colors too!
- 1 teaspoon non-toxic glow-in-the-dark paint or glowing powder: This is where the magic happens! You can find this at craft stores or online. Make sure it’s non-toxic, especially if kids might be handling the jars.
- 1 teaspoon silver or holographic glitter: For that extra sparkle and “electrified” look, this glitter is key. It catches the light beautifully.
- 1 small LED tea light or flashlight: This is your secret weapon for activating the glow! A small LED tea light fits perfectly under most jars.
How to Make Electrified Thunder Glow Jars
Alright, let’s get down to the fun part! Making these glow jars is like a little science experiment mixed with art, and it’s truly delightful.
- Get Your Glow On: In a medium-sized bowl, pour your 1/2 cup of water. Now, add a few drops of blue or purple food coloring. Stir it gently until you have a beautiful, even color. Next, stir in your 1 teaspoon of glow-in-the-dark paint or powder. Mix it really well to ensure there are no clumps and the glow is evenly dispersed. This is the heart of your thunder glow, so make it bright!
- Foundation First: Carefully pour your colored glowing water mixture into your clear glass jar until it’s about halfway full. Take your time with this step to avoid any splashes.
- Oil the Waters: Now, for the cool part! Slowly pour in the 1/2 cup of vegetable oil (or baby oil) until the jar is nearly full. You want to leave a little bit of space at the top, just enough so you can shake it without overflowing. Watch as the oil and water layers separate – it’s already looking pretty neat, right?
- Add the Sparkle: Sprinkle in your 1 teaspoon of silver or holographic glitter. This glitter will float between the layers and give it that dynamic, “electric” storm look when it moves.
- Light It Up: Secure the lid tightly on your jar. Now, turn off the lights in the room to make it nice and dark. Place your small LED tea light or flashlight directly underneath or behind the jar. The light source is what will “charge” and illuminate your glow elements. If you’ve enjoyed this fun craft, you might also like trying another illuminated DIY with our light-up scarecrow mason jars DIY for a different seasonal glow!
- Shake and Marvel: Gently shake or swirl the jar. Watch as the glowing water and glitter dance through the oil, creating an incredible, electrifying thunder effect. It’s absolutely captivating! I always find myself just staring at it, lost in the shimmering glow.
Substitutions & Additions
Part of the joy of DIY is making it your own! Here are a few ideas to customize your Electrified Thunder Glow Jars:
- Color Play: Don’t limit yourself to blue or purple! Green can make a cool alien swamp glow, red could be fiery lava, or even mix a couple of colors for a gradient effect.
- Oil Choices: While vegetable oil works, baby oil gives a very clear, almost invisible upper layer. Mineral oil is another option that’s very clear.
- Glitter Galore: Experiment with different colors and sizes of glitter. Fine glitter gives a misty sparkle, while larger flakes can create more distinct “lightning” flashes. You could even add some iridescent confetti for extra pizzazz.
- Aromatherapy Twist: Add a few drops of essential oil (like lavender or cedarwood) to the water layer for a calming sensory experience. Just be mindful that oil and water don’t mix, so the scent might be subtle.
- Embellish the Jar: Decorate the outside of your jar with ribbon, twine, or even paint a design on the glass. Just make sure not to cover the part where you want the light to shine through!
- Creative Containers: Instead of a jar, use an old, clean plastic bottle for a kid-friendly version, or a tall, slender vase for a more elegant display. Speaking of creative fun, if you love hands-on projects, you should definitely check out how to make your own DIY color-changing crystal stones – another easy craft that brings a touch of magic!
Tips for Success
To ensure your glow jars are absolutely dazzling, keep these little pointers in mind:
- Non-Toxic is Key: Always double-check that your glow paint or powder is labeled “non-toxic,” especially if children will be around. Safety first!
- Mix the Glow Well: Before adding to the jar, really stir the glow paint or powder into the water. Any unmixed bits might clump or settle.
- Slow Pour for Layers: When adding the oil, pour it in slowly over the back of a spoon. This helps maintain distinct layers and prevents too much mixing upfront.
- Darkness is Your Friend: The glowing effect is truly spectacular in a completely dark room. The darker it is, the more vibrant your thunder glow will be.
- Shake, Don’t Stir (Initially): A gentle swirl or shake is all you need to get the “thunder” effect. Too vigorous shaking might emulsify the oil and water slightly, making it cloudy temporarily.
- Prep Ahead: You can mix your colored glow water ahead of time and keep it sealed in a separate container. When you’re ready, just assemble the jar! For other quick treats you can whip up for parties or just because, I often turn to my favorite no-bake brownie batter dip – it’s a total crowd-pleaser!
How to Store Electrified Thunder Glow Jars
These jars are pretty low-maintenance once assembled! Simply keep them at room temperature, away from direct sunlight, which can fade the glow components over time. Since the ingredients are shelf-stable, your glow jar should last indefinitely, providing endless fascination. If the glow seems to diminish over many months, you can always open it up, stir in a little more glow paint, and reseal.
FAQs
Q: Can I use cooking oil other than vegetable oil?
A: Yes, canola or even baby oil (mineral oil) work wonderfully. Olive oil might be too thick and colored, obscuring the glow effect.
Q: Is the glow-in-the-dark paint harmful?
A: Always use non-toxic glow-in-the-dark paint or powder, which is generally safe for crafts. While it’s in a sealed jar, it’s a good practice to use safe materials, especially if children are involved.
Q: My glitter just sank to the bottom. What went wrong?
A: Some glitters are denser than others. If yours sinks, try a lighter, finer glitter, or holographic glitter, which often floats better between the oil and water layers. You can also give it a good shake to redistribute!
Q: How long does the glow last?
A: The glow-in-the-dark paint or powder needs to be “charged” by a light source (like your LED tea light or even regular room light). Once charged, it will emit light for a while, but its intensity will diminish. Placing it on an LED tea light ensures a continuous glow as long as the light is on!
For more creative ideas and delicious recipes, follow us on Pinterest!

Electrified Thunder Glow Jars
Ingredients
Equipment
Method
- Step 1: Get Your Glow On: In a medium-sized bowl, pour 1/2 cup of water. Add a few drops of blue or purple food coloring and stir gently until you have an even color. Next, stir in 1 teaspoon of glow-in-the-dark paint or powder. Mix it really well to ensure there are no clumps and the glow is evenly dispersed.
- Step 2: Foundation First: Carefully pour your colored glowing water mixture into your clear glass jar until it’s about halfway full. Take your time with this step to avoid any splashes.
- Step 3: Oil the Waters: Slowly pour in the 1/2 cup of vegetable oil (or baby oil) until the jar is nearly full, leaving a little space at the top so you can shake it without overflowing. Watch as the oil and water layers separate.
- Step 4: Add the Sparkle: Sprinkle in your 1 teaspoon of silver or holographic glitter. This glitter will float between the layers and give it that dynamic, "electric" storm look when it moves.
- Step 5: Light It Up: Secure the lid tightly on your jar. Turn off the lights in the room to make it nice and dark. Place your small LED tea light or flashlight directly underneath or behind the jar. The light source will "charge" and illuminate your glow elements.
- Step 6: Shake and Marvel: Gently shake or swirl the jar. Watch as the glowing water and glitter dance through the oil, creating an incredible, electrifying thunder effect.