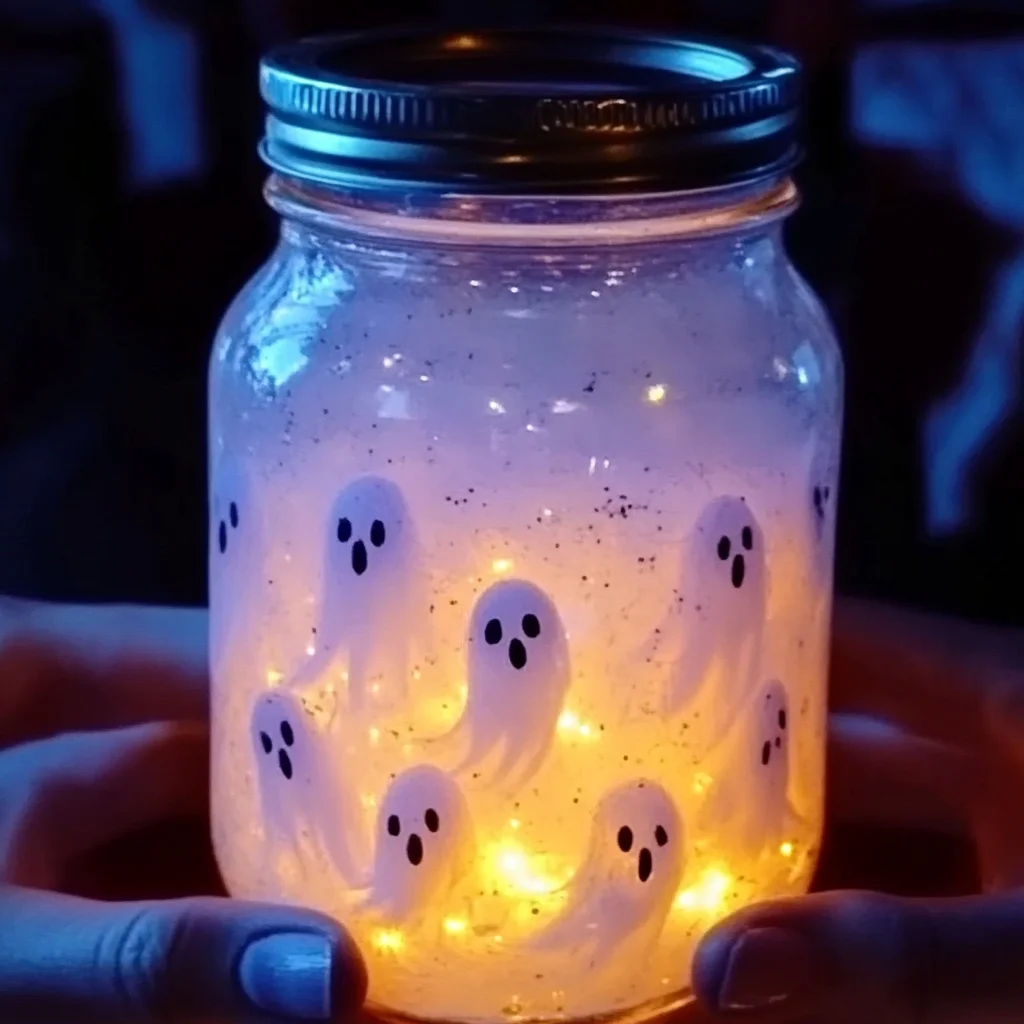
Hey there, my creative friends! Do you ever find yourself searching for that perfect, little something to add a touch of magic and calm to your day, or perhaps a delightful, spooky surprise for the upcoming fall season? I know I do! There’s something so wonderfully nostalgic about homemade crafts, especially when they bring a gentle, calming vibe to our busy lives. Today, we’re diving into a super easy, incredibly fun project that will have ghosts gracefully dancing right before your eyes: the Floating Ghost Sensory Jar! This isn’t just a craft; it’s a little piece of serene, ghostly magic you can shake up whenever you need a moment of wonder or a sweet distraction. Whether you’re making it for a little one, a friend, or just for yourself, I promise it’s a craft that’s as memorable as it is simple.
Why You’ll Love Floating Ghost Sensory Jar
- Fast: You’ll have this enchanting jar ready in minutes!
- Easy: No complicated steps or fancy tools, just simple fun.
- Giftable: Perfect for Halloween parties, birthday favors, or a thoughtful “just because” present.
- Crowd-pleasing: Kids and adults alike will be mesmerized by the floating spirits.
Ingredients
Gathering your supplies for this ghostly creation is a breeze. Here’s what you’ll need to make your very own Floating Ghost Sensory Jar:
- Clear jar or plastic bottle with tight-fitting lid: This is your ghost’s cozy home! A clean, empty pickle jar or a sturdy plastic water bottle works perfectly. The clearer, the better, so you can really see those ghosts glide.
- 1/2 cup clear glue or glitter glue: This is the secret to getting that lovely, slow-motion float. If you use glitter glue, you’re already halfway to a sparkly ghost wonderland!
- 1 1/2 cups warm water: Just enough to help dissolve the glue and create that perfect liquid environment.
- White glitter or iridescent glitter: For a touch of sparkle and an ethereal glow. It makes the ghosts feel even more magical!
- Tiny ghost cutouts (foam, sequins, or laminated paper ghosts): The stars of our show! You can find these at craft stores, or even hand-draw and cut them from white paper (laminating them helps them last longer!).
- A few drops of black or glow-in-the-dark food coloring (optional): Want to make it extra spooky or super magical? This is where you add that special touch!
- Super glue or hot glue: Essential for sealing the lid securely, especially if little hands will be shaking it.
How to Make Floating Ghost Sensory Jar
Alright, grab your apron (or not, this isn’t that kind of messy fun!), and let’s make some magic happen. You won’t believe how simple it is to bring these little spirits to life!
- Fill your jar halfway with warm water. This is our starting point. Warm water helps the glue mix in smoothly, so no chilly surprises for our ghosts!
- Stir in clear glue or glitter glue until dissolved. Pour in that glue and give it a good stir with a spoon or a small whisk. You want it completely blended with the water; this creates the thick, mesmerizing liquid for our ghosts to float in.
- Add white or iridescent glitter. Now for the shimmer! Sprinkle in a generous amount of your chosen glitter. I always go a little extra here because who doesn’t love more sparkle? Give it another gentle stir.
- Drop in small ghost shapes. Carefully place your tiny ghost cutouts into the mixture. Don’t worry if they sink at first; once everything is sealed, they’ll have plenty of room to dance! If you’re looking for more DIY fun, you might also enjoy making some light-up scarecrow mason jars DIY for another charming craft.
- (Optional) Add a few drops of black or glow-in-the-dark food coloring for an eerie effect. If you want a truly haunting look, a tiny drop of black food coloring can turn the water into a spooky abyss. Or, for a mystical glow, a few drops of glow-in-the-dark coloring will really impress when the lights go out!
- Fill to the top with water, leaving a little air space for movement. Top off the jar with more warm water, but remember to leave a small gap at the very top. This air pocket is crucial; it gives the ghosts room to float and drift gracefully when you shake the jar.
- Seal the lid tightly with hot glue or super glue. This step is super important, especially if this jar is for kids! Apply a bead of hot glue or a few drops of super glue around the rim of the jar before twisting the lid on as tightly as possible. Let it dry completely before handling to prevent any leaks.
- Shake gently to watch the ghosts float and drift. And now for the grand finale! Give your jar a gentle shake and watch as the tiny ghosts come alive, swirling and dancing in their glittery world. It’s truly enchanting, and I find it so calming to just sit and watch them for a few minutes.

Substitutions & Additions
One of the best things about DIY projects is making them your own! Here are some ideas to customize your Floating Ghost Sensory Jar:
- Different themed cutouts: Instead of ghosts, try tiny bats, spiders, or even autumn leaves for a different seasonal sensory jar. You can even adapt this concept to create a DIY rain cloud jar with blue food coloring and cotton balls!
- Glycerin: For an even slower, more ethereal float, you can add a tablespoon or two of liquid glycerin along with the glue. It thickens the water beautifully.
- Food Coloring Fun: Experiment with different colors! Purple, green, or even a deep blue could create a totally different mood for your floating scene.
- LED Tea Lights: For an extra magical touch, place an LED tea light under the jar (never inside!) to illuminate your floating ghosts from below.
- Glow-in-the-Dark Elements: Beyond food coloring, you can find glow-in-the-dark glitter or even tiny glow-in-the-dark stars or moons to add to the mix for a starry night effect.
Tips for Success
To ensure your Floating Ghost Sensory Jar is a hauntingly good success, keep these pointers in mind:
- Use warm water: It really helps the glue dissolve smoothly and prevents clumps. Cold water makes it harder to mix evenly.
- Shake well to dissolve glue: Make sure that glue is completely incorporated. If it’s clumpy, your ghosts won’t float as freely.
- Don’t overfill: That little bit of air space is essential for the movement. Too full, and your ghosts will just sit at the top or bottom.
- Secure the lid: I can’t stress this enough! A leaking sensory jar is no fun. Hot glue or super glue is your best friend here.
- Test your ghosts: If you’re making your own paper ghosts, make sure they’re laminated or made from waterproof material. Otherwise, they might get soggy and disintegrate in the water.
How to Store Floating Ghost Sensory Jar
Once your Floating Ghost Sensory Jar is sealed, it’s pretty self-sufficient! You can store it upright on a shelf, a desk, or a nightstand. Because it’s a sealed environment, you don’t really need to worry about mold or evaporation for a good long while. Just keep it out of direct sunlight, which can sometimes fade food coloring over time. With proper sealing, your ghostly friends can keep floating and mesmerizing you for months, or even years!
FAQs
Got a question? I’ve got answers!
Q: Can I use different types of glue?
A: Clear school glue (like Elmer’s washable clear glue) or glitter glue works best for this project as they create the right viscosity for slow movement. Craft glues might be too thick, and super strong glues might not mix well.
Q: My ghosts are just sitting at the bottom! What happened?
A: This usually happens if the glue isn’t fully dissolved or if there isn’t enough air space at the top. Try giving the jar another vigorous shake to ensure the glue is mixed. Also, double-check that you left a small air gap when filling it. If they are still stubborn, you might need to add a touch more glue to thicken the liquid further, or if your cutouts are too heavy, switch to lighter materials like thin foam or sequins.
Q: Is this safe for toddlers?
A: Once sealed with super glue or hot glue, the jar is generally safe for supervised sensory play. However, always ensure the lid is securely fastened and regularly check for any leaks or damage, especially if small children are handling it. The tiny ghost cutouts are sealed inside, preventing any choking hazards.
Q: Can I reuse the jar for another project later?
A: If you’ve sealed it with hot glue, you can usually carefully remove the glue and unscrew the lid, clean out the contents, and reuse the jar! Super glue is a bit more permanent, making it harder to open without damaging the jar or lid. If you enjoyed this creative activity, you might also like trying out easy Halloween cupcakes decorating ideas for another fun project around the spooky season!
For more enchanting crafts, delightful recipes, and creative ideas, follow us on Pinterest!
Floating Ghost Sensory Jar
Ingredients
Equipment
Method
- Step 1: Fill your jar halfway with warm water.
- Step 2: Stir in clear glue or glitter glue until dissolved.
- Step 3: Add white or iridescent glitter.
- Step 4: Drop in small ghost shapes.
- Step 5: (Optional) Add a few drops of black or glow-in-the-dark food coloring for an eerie effect.
- Step 6: Fill to the top with water, leaving a little air space for movement.
- Step 7: Seal the lid tightly with hot glue or super glue.
- Step 8: Shake gently to watch the ghosts float and drift.