Oh, Halloween! Can you smell it? That crisp, cool air, the faint scent of pumpkin spice, and the giddy anticipation of costumes and candy. For me, there’s nothing quite like the magic of creating something special for this time of year, especially when it involves a little bit of frosting and a whole lot of fun. These Halloween cupcakes aren’t just a dessert; they’re a canvas for creativity, a memory-maker, and a guaranteed smile-inducer!
Remember those childhood Halloweens, buzzing with excitement over trick-or-treating? Well, these cupcakes bring that joy right into your kitchen. They’re super easy, surprisingly quick to decorate, and utterly memorable. Whether you’re whipping them up for a school party, a spooky gathering, or just a fun afternoon with the kids, you’ll be amazed at how simple it is to transform a humble cupcake into a tiny, edible work of art. Let’s get baking!
Why You’ll Love Halloween Cupcakes
- Fast
- Easy
- Giftable
- Crowd-pleasing
Ingredients
- 12 prepared cupcakes (pumpkin or preferred recipe): You can use your favorite homemade recipe (if you’re making them from scratch, and pumpkin isn’t quite your jam, you could always go for a classic like our Ultimate Classic Carrot Cake as a base!) or grab a box mix for speed, or even pick up some plain cupcakes from your local bakery. Whatever makes your life easier!
- 1 ½ cups (340g) unsalted butter, softened: This is the heart of our creamy buttercream. Make sure it’s properly softened – not melted – for that perfect smooth texture.
- 6 cups (720g) confectioners’ sugar: Also known as powdered sugar, this is the secret to a silky, smooth frosting that pipes beautifully.
- 6 Tablespoons (60ml) heavy cream, half-and-half, or whole milk, at room temperature: This adds richness and helps achieve the ideal frosting consistency. Room temperature is key!
- 2 teaspoons pure vanilla extract: A classic flavor booster that makes everything taste better. Don’t skip it!
- Salt, to taste: Just a tiny pinch can make all the difference, balancing out the sweetness of the frosting.
- Gel food coloring (Leaf Green, Fuchsia, Violet, Super Black, Orange): Gel colors are my go-to for vibrant, deep shades without thinning your frosting. Fuchsia and Violet together make a gorgeous purple!
- Assorted candy eyeballs (small, large, mini): These are your shortcut to instant character! They come in all sizes for different monster moods.
- Oreo Mini cookies: Perfect for creating our spooky (but cute!) spiders.
- Optional: Sprinkles: Because sometimes, more sparkle is exactly what you need!
How to Make Halloween Cupcakes
Alright, let’s get those hands (and kitchen) a little bit messy – in the best way possible! Here’s how you’ll bring these spooky treats to life:
- Whip that Butter: First things first, grab your stand mixer (or a trusty handheld one!) and that beautifully softened unsalted butter. Beat it on medium speed for about 2 minutes. You want it light, fluffy, and creamy, almost like a cloud. This step is crucial for an airy buttercream!
- Sweeten Things Up: Now, gradually add 5 ½ cups of your confectioners’ sugar, the heavy cream, and the vanilla extract. Start beating on low speed for about 30 seconds to prevent a sugar cloud from engulfing your kitchen (trust me, I’ve been there!). Once it’s mostly incorporated, bump up the speed to medium-high and beat for a good 2 minutes. This helps get it wonderfully fluffy.
- Perfect the Consistency: Give your buttercream a little taste. If it’s a tad too sweet for your liking, add a tiny pinch of salt (about ⅛ teaspoon) – it really helps to balance the flavors! If you notice any stubborn air bubbles, gently fold the buttercream with a spatula for a minute or two. This “aerates” it and gives you that smooth, professional finish.
- Adjust as Needed: Is your frosting a little too runny? No worries! Add up to an additional ½ cup of confectioners’ sugar, a tablespoon at a time, until it thickens up. If it’s too stiff, add more heavy cream, again, 1 tablespoon at a time, until you hit that perfect, pipeable consistency.
- Color Your World (or Frosting!): Divide your glorious buttercream into several bowls. Now for the fun part: add your gel food colorings! Create a vibrant green with Leaf Green, a spooky purple by mixing Fuchsia and Violet, a bright orange, and a deep Super Black. Leave one portion white for some classic contrasting designs. Mix each color until it’s a uniform, beautiful shade.
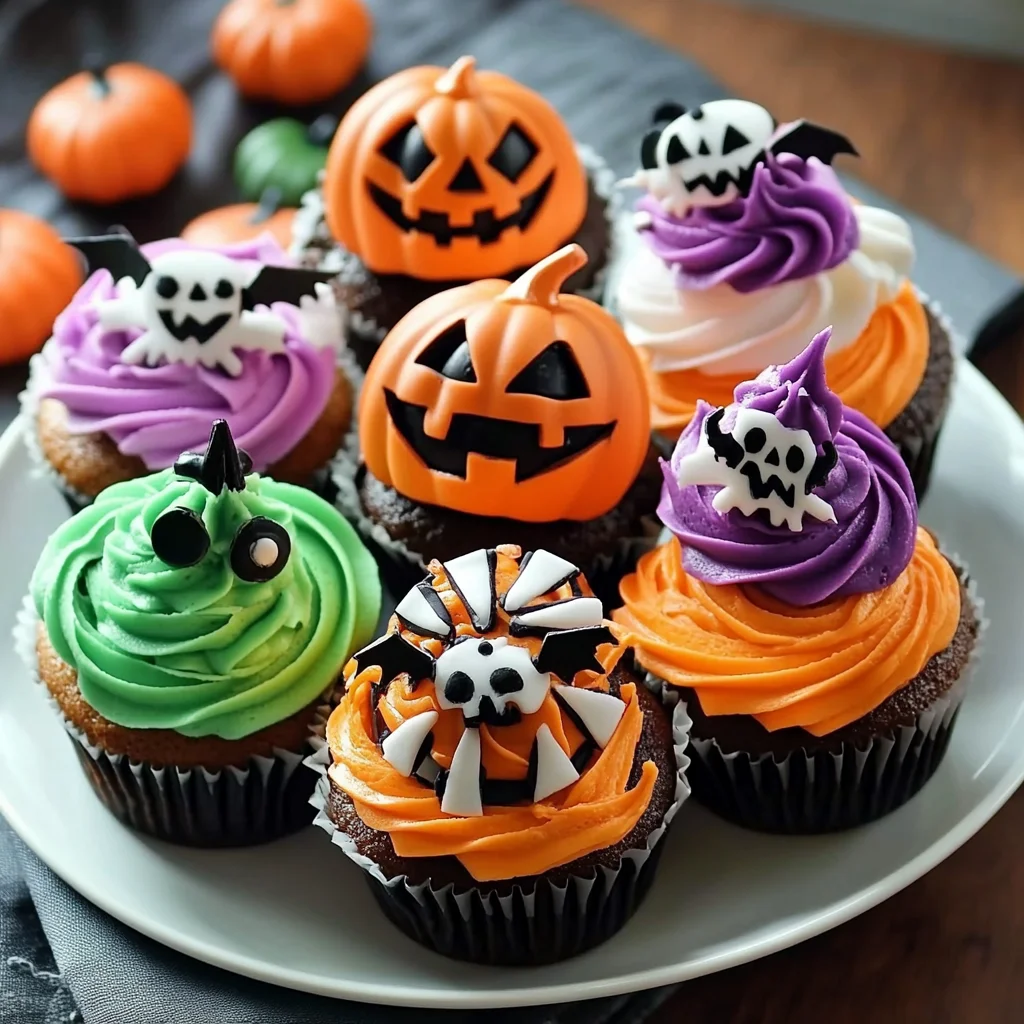
- Green Spiral Surprise: Grab a piping bag and fit it with a small open star tip (like a Wilton 21). Fill it with your green frosting. Now, on a prepared cupcake, pipe a lovely spiral, starting from the outside edge and working your way inward. Once you’re done, gently press a large candy eyeball right into the center. Voila! A one-eyed wonder!
- Purple Monster Mash: For these adorable little monsters, fill another piping bag with your purple frosting. Cover the entire surface of a cupcake with piped stars. Just apply steady pressure and create little starry bursts all over. Then, press a few small candy eyeballs into the frosting to give your monster a face (or several!). If you’re feeling extra festive, sprinkle some fun Halloween sprinkles on top!
- Pumpkin Patch Perfection: This one uses three piping bags!
- First, fill a bag with orange frosting and a large petal tip (like a Wilton 125). Pipe rounded lines from the top to the bottom of your cupcake, alternating sides and working towards the center. This builds up that classic pumpkin shape.
- Next, switch to a bag with green frosting and a small open star tip (Wilton 21) to pipe a cute little stem on top.
- Finally, use a bag with black frosting and a small round tip (Wilton 4) to pipe on the pumpkin’s eyes, nose, and mouth. Get creative with spooky or silly faces!
- Creepy-Crawly Spider Web: Start by spreading a layer of white frosting evenly over a cupcake using a small spatula. Take another piping bag filled with black frosting, fitted with a small round tip (Wilton 4). Pipe criss-cross lines over the white frosting to form the basic web structure. Then, connect those lines with curved lines to complete your spider web pattern. Gently place half an Oreo Mini cookie on the web. Using your black frosting, pipe tiny eyes onto the Oreo, then carefully attach mini candy eyeballs on top. Finish by piping eight little spider legs around the Oreo, extending onto the web. So spooky, so cute! After all that piping fun, if you’re looking for another delightful, easy-to-decorate dessert, you might love our Easy Vanilla Macaron Cupcakes – they’re another canvas for your creativity!

Substitutions & Additions
The beauty of these Halloween cupcakes is how adaptable they are! Feel free to play around and make them truly your own:
- Cupcake Base: Not a pumpkin fan? No problem! Use chocolate, vanilla, red velvet, or even a spiced apple cupcake base. A simple box mix is totally fine here – it’s all about the decoration!
- Buttercream Swaps: If you’re short on time, grab a tub of store-bought vanilla frosting and tint it yourself. For a richer flavor, you could try a cream cheese frosting, just make sure it’s firm enough to pipe.
- Creative Decorations:
- Gummy Worms: Stick them in “dirt” (crushed Oreo crumbs) for a graveyard effect.
- Candy Corn: Classic Halloween candy can be added to the top of any design for an extra pop of color.
- Pretzel Sticks: Break them into pieces for witch’s broomsticks or Frankenstein’s bolts.
- Edible Glitter: A little shimmer can make your monsters extra magical.
- Candy Pumpkins/Ghosts: Small candies can replace piped designs if you’re in a hurry.
- Chocolate Chips: Use mini chocolate chips for monster eyes or spooky mouth details.
- Flavor Boosts: Add a touch of almond extract, peppermint extract, or even a hint of espresso powder to your buttercream for an extra layer of flavor.
Tips for Success
Making these cupcakes is all about having fun, but a few little tricks can make the process even smoother:
- Softened Butter is Key: I can’t stress this enough! If your butter is too cold, your buttercream will be lumpy. If it’s too warm, it’ll be runny. It should be soft enough to easily indent with your finger.
- Don’t Overmix the Buttercream: Once you’ve added the sugar and liquid, mix until combined and fluffy, then stop. Overmixing can incorporate too much air, leading to a less stable frosting.
- Use Gel Food Coloring: Liquid food coloring can thin your frosting and often doesn’t give you the vibrant colors you want for Halloween. Gel colors are concentrated and won’t affect the consistency.
- Room Temperature Ingredients: Beyond the butter, ensuring your heavy cream (or milk) is at room temperature helps it emulsify better with the butter and sugar, creating a smoother frosting.
- Practice Makes Perfect (Almost!): If you’re new to piping, don’t stress! Grab a piece of parchment paper or a plate and practice your spirals, stars, and lines before committing to a cupcake. You can always scrape the frosting back into the bag.
- Prep Ahead: You can bake your cupcakes a day in advance and store them in an airtight container at room temperature. The buttercream can also be made a day ahead and stored in the fridge. Just let it come to room temperature and re-whip it for a few minutes before decorating.
How to Store Halloween Cupcakes
You’ve put all that love and effort into these spooky treats, so let’s make sure they stay fresh and delicious!
- Room Temperature: If you’re planning to serve your decorated cupcakes within a few hours, they’ll be perfectly fine (and often taste best!) stored uncovered at room temperature.
- Refrigeration for Longer: For longer storage, or if your kitchen is particularly warm, cover the cupcakes loosely with plastic wrap or place them in an airtight container. They will keep well in the refrigerator for up to 5 days.
- Bringing to Room Temp: If you’ve refrigerated them, let them sit at room temperature for about 15-30 minutes before serving. This allows the buttercream to soften slightly, giving you the best texture and flavor.
FAQs
Q: Can I use a store-bought cake mix for the cupcakes?
A: Absolutely! Using a store-bought mix for your cupcakes is a fantastic shortcut that makes this recipe even faster and easier. No judgment here – it’s all about the fun decorations!
Q: What if I don’t have piping bags or tips?
A: No problem at all! You can improvise by snipping a small corner off a sturdy Ziploc bag. It works perfectly for piping, especially for the simpler designs like the spider web lines or monster stars.
Q: How can I get my frosting colors to be really vibrant?
A: The secret is gel food coloring! It’s much more concentrated than liquid food coloring and won’t thin out your buttercream, allowing you to achieve those deep, spooky, and bright Halloween hues.
Q: Can I make the buttercream ahead of time?
A: Yes, you can! Prepare the buttercream and store it in an airtight container in the refrigerator for up to a week. When you’re ready to use it, let it come to room temperature, then re-whip it with your stand mixer or hand mixer for a few minutes until it’s light and fluffy again.
These Halloween cupcakes are truly a blast to make, and I promise you’ll love seeing the smiles they bring. Happy spooky season, my friends!
For more delicious inspiration and daily recipe ideas, be sure to follow us on Pinterest!
And if you’re ever in the mood for something quick and sweet, don’t forget to browse the rest of the fantastic recipes over at Easily Cooked!
Easy & Spooktacular Homemade Halloween Cupcakes
Ingredients
Equipment
Method
- Step 1: First things first, grab your stand mixer (or a trusty handheld one!) and that beautifully softened unsalted butter. Beat it on medium speed for about 2 minutes. You want it light, fluffy, and creamy, almost like a cloud. This step is crucial for an airy buttercream!
- Step 2: Now, gradually add 5 ½ cups of your confectioners' sugar, the heavy cream, and the vanilla extract. Start beating on low speed for about 30 seconds to prevent a sugar cloud from engulfing your kitchen (trust me, I’ve been there!). Once it’s mostly incorporated, bump up the speed to medium-high and beat for a good 2 minutes. This helps get it wonderfully fluffy.
- Step 3: Give your buttercream a little taste. If it's a tad too sweet for your liking, add a tiny pinch of salt (about ⅛ teaspoon) – it really helps to balance the flavors! If you notice any stubborn air bubbles, gently fold the buttercream with a spatula for a minute or two. This "aerates" it and gives you that smooth, professional finish.
- Step 4: Is your frosting a little too runny? No worries! Add up to an additional ½ cup of confectioners' sugar, a tablespoon at a time, until it thickens up. If it’s too stiff, add more heavy cream, again, 1 tablespoon at a time, until you hit that perfect, pipeable consistency.
- Step 5: Divide your glorious buttercream into several bowls. Now for the fun part: add your gel food colorings! Create a vibrant green with Leaf Green, a spooky purple by mixing Fuchsia and Violet, a bright orange, and a deep Super Black. Leave one portion white for some classic contrasting designs. Mix each color until it’s a uniform, beautiful shade.
- Step 6: Grab a piping bag and fit it with a small open star tip (like a Wilton 21). Fill it with your green frosting. Now, on a prepared cupcake, pipe a lovely spiral, starting from the outside edge and working your way inward. Once you're done, gently press a large candy eyeball right into the center. Voila! A one-eyed wonder!
- Step 7: For these adorable little monsters, fill another piping bag with your purple frosting. Cover the entire surface of a cupcake with piped stars. Just apply steady pressure and create little starry bursts all over. Then, press a few small candy eyeballs into the frosting to give your monster a face (or several!). If you’re feeling extra festive, sprinkle some fun Halloween sprinkles on top!
- Step 8: This one uses three piping bags! First, fill a bag with orange frosting and a large petal tip (like a Wilton 125). Pipe rounded lines from the top to the bottom of your cupcake, alternating sides and working towards the center. This builds up that classic pumpkin shape. Next, switch to a bag with green frosting and a small open star tip (Wilton 21) to pipe a cute little stem on top. Finally, use a bag with black frosting and a small round tip (Wilton 4) to pipe on the pumpkin’s eyes, nose, and mouth. Get creative with spooky or silly faces!
- Step 9: Start by spreading a layer of white frosting evenly over a cupcake using a small spatula. Take another piping bag filled with black frosting, fitted with a small round tip (Wilton 4). Pipe criss-cross lines over the white frosting to form the basic web structure. Then, connect those lines with curved lines to complete your spider web pattern. Gently place half an Oreo Mini cookie on the web. Using your black frosting, pipe tiny eyes onto the Oreo, then carefully attach mini candy eyeballs on top. Finish by piping eight little spider legs around the Oreo, extending onto the web. So spooky, so cute!