There’s something truly magical about Easter cookie traditions, isn’t there? I always think back to those cozy afternoons spent with family, rolling out dough and decorating cookies with bright, cheerful colors that just scream springtime joy. Easter Bunny Button Cookies bring all those memories right back and add a playful twist with their adorable candy buttons. These cookies aren’t just cute—they’re quick to whip up, simple enough for even the busiest day, and perfect for sharing with friends, neighbors, or your little ones.
If you’re looking for a charming, crowd-pleasing recipe that feels like a warm hug from your childhood, you’re in the right place. Plus, you don’t need fancy skills or complicated ingredients to make these. Let me walk you through why these Easter treats will become a favorite in your kitchen this season.
Why You’ll Love Easter Bunny Button Cookies
- Fast: From mixing to baking, these cookies come together in under 30 minutes, making them ideal for last-minute holiday baking.
- Easy: The straightforward ingredients and simple steps mean even baking beginners can succeed with ease.
- Giftable: Their charming appearance makes these cookies perfect for gifting in cute little treat bags or boxes.
- Crowd-pleasing: The crispy edges and buttery centers combined with the sweet candy buttons appeal to kids and adults alike.
Ingredients
Let’s talk about what you’ll need to bring these adorable bunnies to life. The ingredient list is refreshingly simple, relying on classic baking staples with a few festive extras to brighten things up:
- 1 cup unsalted butter, softened: Butter is the heart of these cookies, giving them that melt-in-your-mouth richness. Make sure it’s softened to room temperature for easy mixing.
- 1 cup granulated sugar: Granulated sugar sweetens the dough and helps it crisp up nicely on the edges.
- 1 large egg: This binds everything together and adds a little moisture to the dough.
- 1 teaspoon vanilla extract (or almond extract): I love the warm, comforting aroma vanilla brings, but almond extract offers a lovely nutty twist if you want to switch things up.
- 2½ cups all-purpose flour: This is your cookie’s structure. Be sure to measure it properly by spooning into the cup and leveling it off.
- ½ teaspoon baking powder: This little lift helps keep the cookies soft and tender.
- ¼ teaspoon salt: Salt balances the sweetness and enhances all the other flavors.
- Colored sanding sugar: This adds sparkle and festive color to the cookie shells. Pick pastel shades to stay in that Easter spirit!
- Pastel chocolate buttons or candy-coated chocolates: These are the star of the show—the “buttons” that you press into the cookies after baking. They add a fun texture and a pop of sweetness.
If you’re curious about other sweet treats to brighten your dessert table, you might want to check out this Pineapple Cream Cheese Pound Cake recipe that’s equally crowd-pleasing and perfect for spring celebrations.
How to Make Easter Bunny Button Cookies
Ready to get your hands a little buttery? Here’s how you can create these charming cookies, step by step. I promise, it’s as fun to make as it is to eat.
- Preheat your oven: Set it to 350°F (175°C) and line a baking sheet with parchment paper. This prevents sticking and makes cleanup a breeze.
- Beat the butter and sugar: Using a hand mixer or stand mixer, beat the softened butter and granulated sugar until the mixture looks light and fluffy. This step is key to a tender cookie, so don’t rush it!
- Add egg and vanilla: Crack in the egg and pour your vanilla extract (or almond). Mix well until everything is fully combined and smooth.
- Whisk the dry ingredients: In a separate bowl, whisk together the all-purpose flour, baking powder, and salt. This ensures that the baking powder and salt are evenly distributed throughout the flour.
- Combine wet and dry: Gradually add the flour mixture to the butter mixture. Stir gently until a soft dough forms. Be careful not to overmix here—that can make your cookies tough.
- Form the cookie balls: Roll the dough into 1-inch balls. Don’t worry about perfect shapes; rustic looks charming here! Then, roll each ball in colored sanding sugar to coat them beautifully.
- Arrange on baking sheet: Place the dough balls onto your prepared sheet, leaving some space between each as they will spread slightly.
- Create the button indentation: Use your thumb or the back of a spoon to gently press a small indentation into the center of each dough ball. This is where your candy button will nestle in later.
- Bake: Pop the tray into the oven and bake for 10–12 minutes, or until the edges are just starting to turn a light golden color. Keep a close eye here; you want them soft, not overbaked.
- Add the chocolate buttons: As soon as the cookies come out of the oven and are still warm, press a pastel chocolate button or candy-coated chocolate into the center indentation of each cookie. They’ll soften slightly and stick perfectly.
- Cool: Let the cookies cool on the baking sheet for about 5 minutes before transferring them to a wire rack to cool completely. This helps them firm up without losing their delicate texture.
One of my favorite things about these cookies is how they pair beautifully with an afternoon cup of tea or a classic glass of milk. If you enjoy baking cookies, you’ll definitely want to explore other delightful recipes like the Easy Homemade Samoas Cookies for another crowd-pleaser with a nostalgic twist.

Substitutions & Additions
Don’t be afraid to get a little creative with this recipe. While the classic combo is unbeatable, here are some swaps and additions you might want to try:
- Butter substitutes: If you want a dairy-free option, try using vegan butter sticks. Just make sure they’re softened like regular butter.
- Sugar alternatives: Coconut sugar or superfine sugar can work well, though they might change the color and texture slightly.
- Extracts: Almond extract is a wonderful alternative to vanilla for a different flavor profile. You can also experiment with lemon or orange extract for a citrusy note.
- Flour swaps: For a gluten-free version, a 1:1 gluten-free baking flour blend can work—just make sure it contains xanthan gum or another binder.
- Decorations: Instead of sanding sugar, you could roll the dough balls in finely chopped nuts or colored nonpareils for a different texture and look.
- Chocolate buttons variations: Use mini peanut butter cups, white chocolate chips, or even small jellybeans for a fun twist.
Plus, if you’re planning a full spring or Easter spread, these cookies would be a lovely addition alongside something more substantial like an Easy Pecan Pie Recipe, which brings a sweet, nutty warmth to the table.
Tips for Success
Even though this recipe is straightforward, a few insider tips can help you get perfect results every time. Here’s what I’ve learned from baking these cookies over the years:
- Don’t overbeat the dough: Once you add the flour, mix just until combined. Overmixing develops gluten, making cookies tougher.
- Softened butter is essential: Too cold or melted butter won’t cream properly with sugar, affecting texture and rise.
- Press the candy buttons while cookies are warm: If you wait until they’re completely cool, the buttons won’t stick well.
- Use parchment paper: It prevents sticking and helps cookies bake evenly.
- Prep ahead: You can roll the dough into balls, coat them in sanding sugar, and refrigerate on the baking sheet for up to 24 hours. Just bake straight from the fridge, adding a minute or two to baking time.
- Don’t skip the indentation: This keeps your candy buttons snug and neat, preventing them from sliding off.
For more helpful baking tips and easy recipes that fit into busy schedules, there’s a treasure trove waiting for you at Recettia’s homepage. I love how many simple, approachable recipes they have for every occasion!
How to Store Easter Bunny Button Cookies
Once you’ve baked your batch of Easter Bunny Button Cookies, you’ll want to keep them fresh and tasty. Here’s how I recommend storing them:
- Cool completely: Before storing, make sure the cookies are fully cooled to prevent moisture buildup.
- Airtight container: Place the cookies in a single layer in an airtight container. If stacking is necessary, separate layers with parchment paper to avoid sticking.
- Room temperature: Stored this way, cookies will stay fresh for up to 5 days.
- Freezing: For longer storage, freeze the baked cookies in a sealed container or freezer bag for up to 3 months. Thaw at room temperature before serving.
If you want to keep your Easter treats on hand but don’t want to bake every time, rolling and freezing dough balls is a great shortcut. You can bake fresh cookies in just minutes whenever the craving hits!
FAQs
Can I make these cookies without sanding sugar?
Absolutely! While sanding sugar adds sparkle and a bit of crunch, you can skip it or substitute with colored nonpareils, finely chopped nuts, or even just plain dough balls. The cookies will still be delicious.
What if I don’t have pastel chocolate buttons?
No worries. You can use any small candies like mini chocolate chips, jellybeans, or even M&M’s. Try to pick colors that match your Easter theme for the best look.
Can I use a different type of flour?
All-purpose flour works best for texture, but you can try a gluten-free blend if needed. Just make sure it’s a baking blend with xanthan gum or another binder to get the right consistency.
How do I keep my cookies soft?
Don’t overbake! Pull the cookies out when the edges are just turning golden. Also, storing them in an airtight container helps maintain softness.
Looking for more festive cookie inspiration? You might enjoy the Easter Cookie Cake Festive Treat for a fun and easy dessert idea that’s just as playful and delicious.
Thanks for spending time with me in the kitchen today! I hope these Easter Bunny Button Cookies bring a smile to your spring celebrations and create new memories just as sweet as the treats themselves.
Don’t forget to follow me on Pinterest for even more delightful recipes and cozy cooking inspiration!
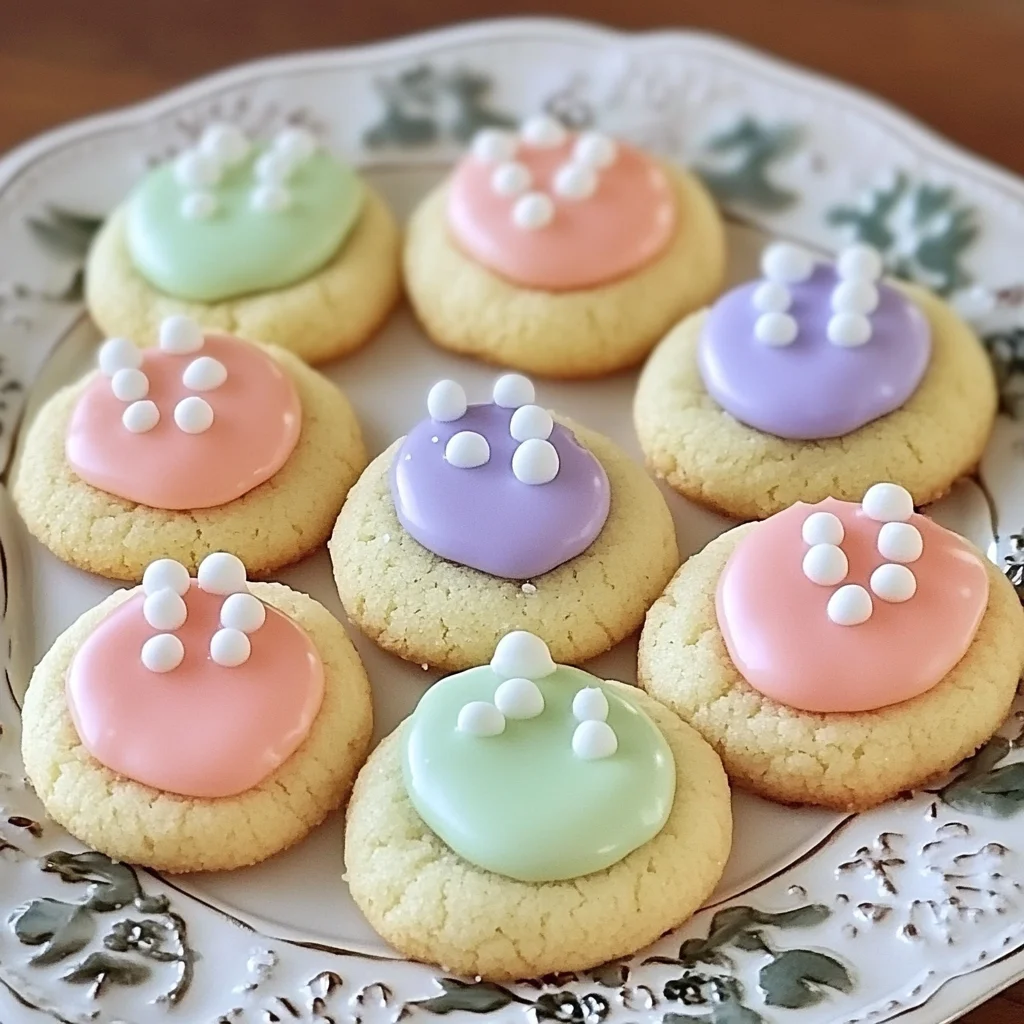
Delightfully Sweet Easter Bunny Button Cookies
Ingredients
Equipment
Method
- Step 1: Preheat your oven to 350°F (175°C) and line a baking sheet with parchment paper.
- Step 2: Using a hand mixer or stand mixer, beat the softened butter and granulated sugar until light and fluffy.
- Step 3: Add the egg and vanilla (or almond) extract and mix until fully combined and smooth.
- Step 4: In a separate bowl, whisk together the all-purpose flour, baking powder, and salt.
- Step 5: Gradually add the dry ingredients to the wet mixture. Stir gently until a soft dough forms, being careful not to overmix.
- Step 6: Roll the dough into 1-inch balls, then roll each ball in colored sanding sugar to coat.
- Step 7: Place the dough balls spaced apart on the prepared baking sheet.
- Step 8: Use your thumb or the back of a spoon to gently press a small indentation into the center of each dough ball.
- Step 9: Bake for 10–12 minutes, or until edges are lightly golden but cookies remain soft.
- Step 10: Immediately after removing from oven, press a pastel chocolate button or candy-coated chocolate into the indentation of each warm cookie.
- Step 11: Let cookies cool on the baking sheet for 5 minutes, then transfer to a wire rack to cool completely.