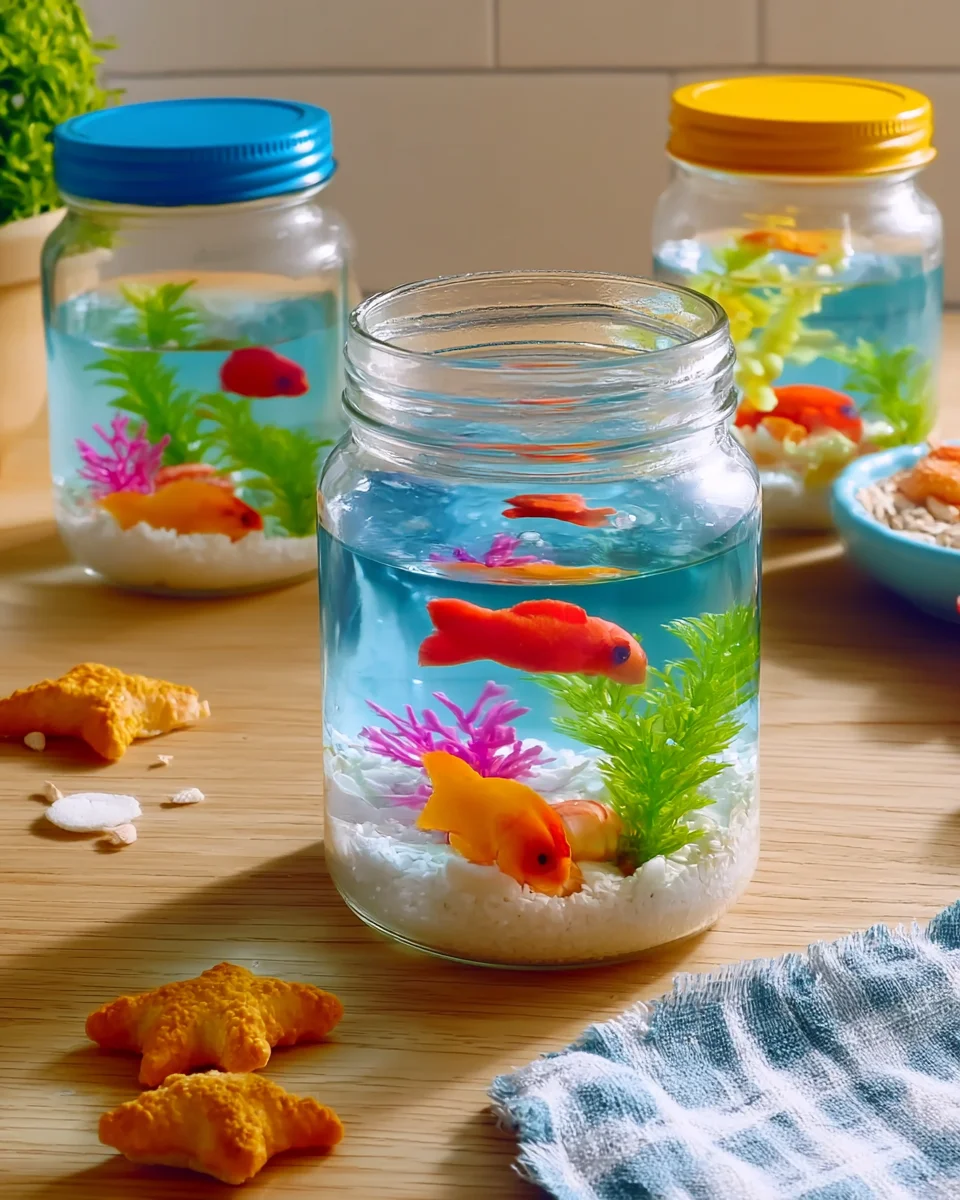
Have you ever wanted to create something that brings together the joy of crafting and the sweetness of a delicious treat? Imagine a shimmering underwater world that you can actually eat! That’s exactly what you’ll create with these Delightful Edible Aquarium Terrariums. This project isn’t just about food; it’s a celebration of creativity, color, and the sheer delight of making something beautiful with your own hands. Picture your friends and family gathering around, their eyes wide with wonder as they discover the colorful layers of your edible creation. Let’s dive into this fun DIY adventure together!
Why You’ll Love Delightful Edible Aquarium Terrariums
- Beginner-friendly
- Budget-friendly
- Creative and fun
- Great for kids and families
- Perfect for gifts, decorating, or everyday use
- Customizable
The Heart Behind This DIY
Creating these edible aquarium terrariums isn’t just about the final product; it’s about the experience of making it. There is something so fulfilling about mixing, layering, and decorating, much like building a miniature world of your own. It encourages mindfulness as you focus on each step, from preparing the gel to arranging the gummy sea creatures. This project is perfect for bonding time with kids, allowing you to teach them about colors, textures, and even a bit of science with the gel setting process. Plus, it’s a fantastic way to boost confidence as you see your beautiful creation come to life—one layer at a time.
A Gentle Look at the Process
As you embark on this delightful journey, you’ll find yourself immersed in a sensory experience. The vibrant colors of the blue gel, the sweet aroma of fresh fruits, and the fun of arranging your edible decorations all come together to create magic. The process is simple yet engaging, and the joy builds with every layer you add. You’ll feel the excitement grow as you pour the gel, layer the sandy shores, and place the colorful sea creatures. It’s a beautiful way to express your creativity while enjoying some quality time with loved ones.
Materials You’ll Need
- Clear glass or acrylic containers (small fish bowls or jars) – to hold your edible masterpiece
- Edible gel (e.g., agar-agar or gelatin) – for creating the “water” layers
- Blue food coloring – to give your gel that oceanic hue
- Gummy fish or sea creatures (e.g., gummy sharks, fish, jelly fish) – for a playful touch
- Edible decorations (e.g., crushed graham crackers for sand, edible flowers) – to enhance the scenery
- Fresh fruits (e.g., blueberries, kiwi, or grapes for rocks) – for a natural look
- Optional: edible glitter or sprinkles for extra flair – to add some sparkle
Step-by-Step Directions
Step 1: Prepare the Gel
Start by dissolving your gelatin or agar-agar in hot water according to the package instructions. If you’re using agar-agar, heat it with water until fully melted. Once dissolved, add blue food coloring until you achieve the perfect ocean-like color. Stir well to combine; this will be the water that your sea creatures swim in!
Step 2: Create the Base
Pour a small amount of the blue gel mixture into the bottom of your container to create the “water” layer. It should only cover the bottom. Allow it to set in the refrigerator for about 30 minutes until firm. This is the foundation of your aquarium!
Step 3: Add Rocks and Sand
Once the first layer is set, sprinkle crushed graham crackers on top to represent sandy shores. Then, add fresh fruits like blueberries or cut kiwi pieces to mimic rocks or coral. This will add a lovely natural touch to your terrarium.
Step 4: Add More Gel
Pour more of the blue gel mixture over the sand and rocks to encase them, creating depth in your aquarium. Let this layer set in the refrigerator for another 30 minutes. You’ll see your underwater scene starting to take shape!
Step 5: Decorate with Edible Sea Creatures
Once the second layer is firm, carefully place gummy fish or sea creatures into the terrarium. Arrange them to create a playful underwater scene. For an extra decorative touch, sprinkle some edible glitter or add edible flowers on top to make it truly special.
Step 6: Final Layer of Gel
Pour a final layer of blue gel over the entire terrarium to seal in the decorations. Let it set in the refrigerator until completely firm. This layer will give your aquarium a polished and finished look.
Step 7: Serve and Enjoy!
Once fully set, your edible aquarium terrarium is ready to be served. Use a spoon to scoop out the delightful layers and enjoy the colorful flavors. It’s a treat that is as fun to make as it is to eat!
Creative Ways to Use Delightful Edible Aquarium Terrariums
These edible terrariums are perfect for a variety of occasions! You can use them as unique party desserts, fun additions to a family gathering, or even as a centerpiece for special events. They also make great gifts for birthdays or holidays, bringing a smile to anyone who receives them. You can even personalize them with different themes or colors to match the season, making them a creative staple in your kitchen.
How to Store, Preserve, or Maintain Delightful Edible Aquarium Terrariums
To keep your delightful terrariums fresh, store them in the refrigerator. They can typically last for a few days, but I recommend enjoying them within a couple of days for optimal flavor and texture. Just be sure to cover them to prevent any unwanted odors from mingling with your delicious creation!
Creative Variations and Customizations
- Color or finish variations – experiment with different gel colors or add layers of flavored gel.
- Theme ideas – create themed aquariums with specific sea creatures or colors.
- Seasonal adaptations – use seasonal fruits or decorations to reflect the time of year.
- Kid-friendly or beginner-friendly modifications – simplify with fewer layers for younger children.
- Advanced creative upgrades – add edible lights or other fun decorations for a more elaborate design.
Tips for Success
- Common mistakes to avoid – ensure each layer sets completely before adding the next to prevent mixing.
- Safety tips – if using hot water, be cautious and supervise children during the process.
- Preparation suggestions – gather all materials and tools beforehand for a smooth experience.
- Cleanup recommendations – keep a damp cloth nearby for easy cleanup of any spills.
- Expert tips – don’t hesitate to get creative with flavors and textures; the sky’s the limit!
FAQs About Delightful Edible Aquarium Terrariums
Can beginners make this?
Absolutely! This project is beginner-friendly and perfect for anyone looking to get creative in the kitchen.
Can children participate?
Yes! Children will love helping with the layering and decorating, making this a fantastic family activity.
How long does it last?
Your terrarium can last for a few days in the refrigerator, but it’s best enjoyed fresh within a couple of days.
Can I customize it?
Definitely! Feel free to customize your terrarium with different colors, fruits, and edible decorations to make it your own.
A Final Creative Note
As you wrap up this delightful project, remember that the joy of creating something with your hands is truly special. Each layer of your edible aquarium terrarium tells a story of creativity, love, and fun. Celebrate your unique creation and share it with those you care about. If you’re looking for more delicious recipes, check out the Cinnamon Orange Jam Linzer Cookies or the Berry Crumble with Fresh Berries for treats you will love!
And for even more DIY inspiration, be sure to follow our Pinterest account!