There’s something truly magical about the classic Boston Cream Pie, isn’t there? That perfect harmony of creamy vanilla custard and rich chocolate glaze wrapped up in a tender cake. It’s a nostalgic dessert that takes me back to cozy family gatherings and joyful celebrations. Now, imagine capturing all those comforting flavors in one luscious, bite-sized treat—Boston Cream Pie Fudge! This recipe is a delightful twist that’s easy to make, quick to set, and absolutely unforgettable. Whether you’re whipping it up for a special occasion or just to satisfy a sweet craving, this fudge will become a new favorite in your kitchen.
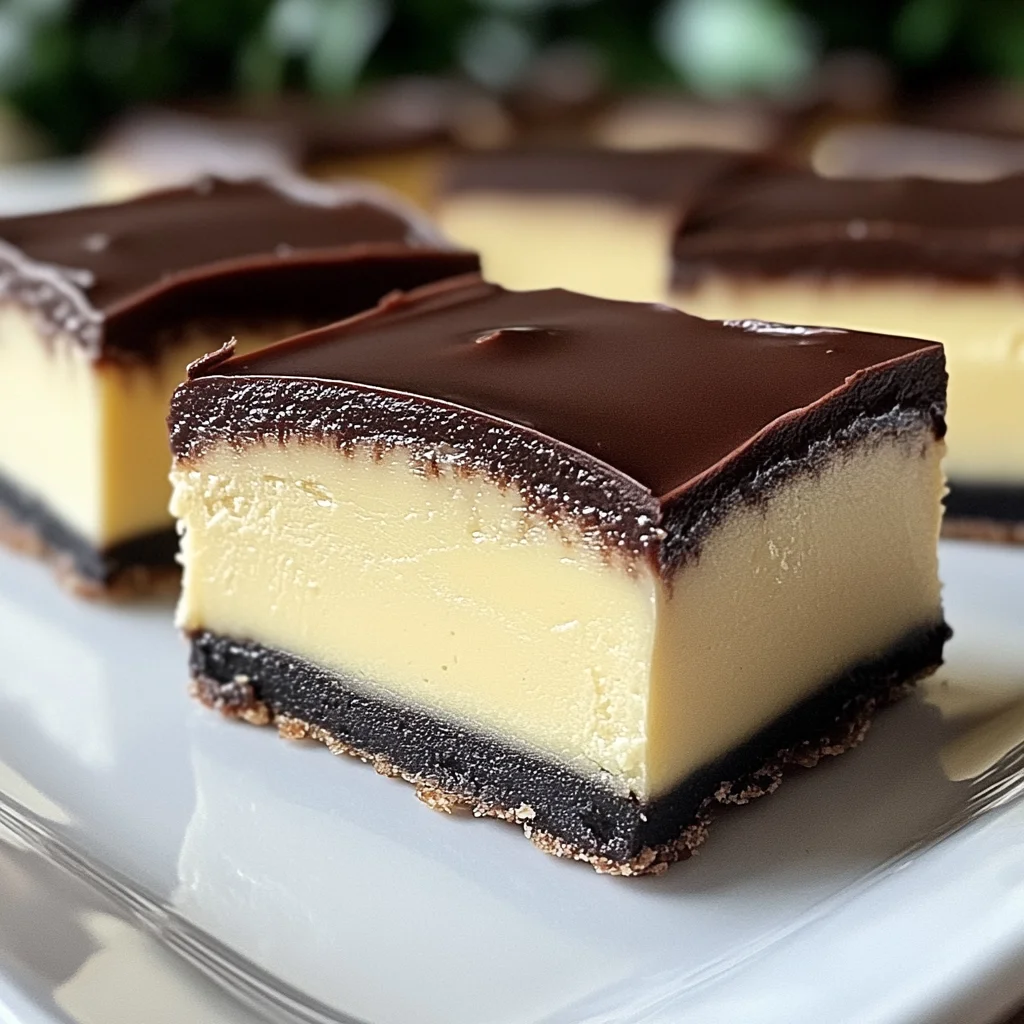
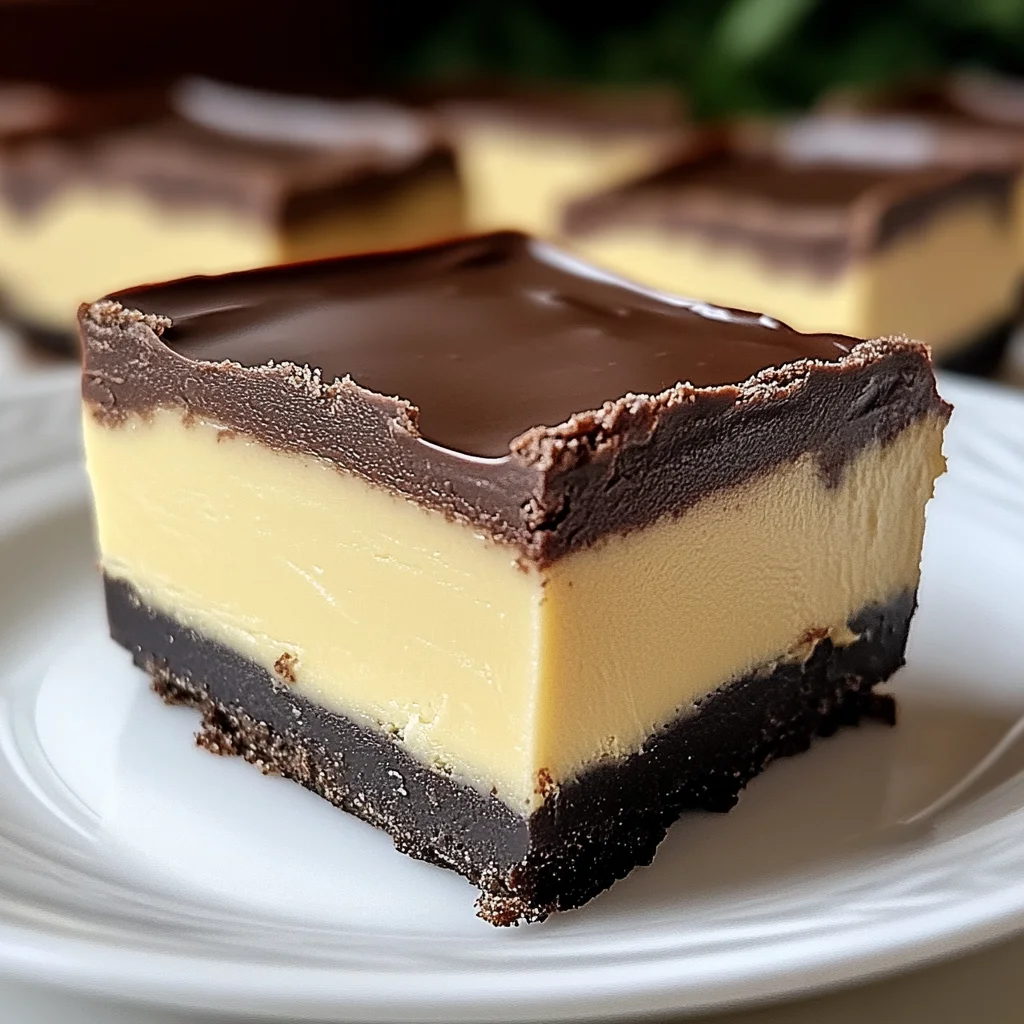
What I love most about this Boston Cream Pie Fudge is how it brings together the best of both worlds: the creamy, dreamy vanilla fudge base combined with a decadent chocolate swirl and finished with a glossy chocolate glaze. It’s a rich, melt-in-your-mouth experience that’s surprisingly simple to create. I promise, once you try this, it’ll be hard to go back to ordinary fudge recipes!
Why You’ll Love Boston Cream Pie Fudge
- Fast: From start to finish, this fudge comes together in just a couple of hours, including cooling time.
- Easy: No fancy equipment or complicated steps—perfect for both beginners and seasoned bakers.
- Giftable: Wrapped up nicely, these fudge squares make wonderful homemade gifts for friends, family, or neighbors.
- Crowd-pleasing: The luscious vanilla and chocolate combo is sure to impress at any party or holiday gathering.
Ingredients
Here’s what you’ll need to bring this Boston Cream Pie Fudge to life. Each ingredient plays a special role in crafting that luscious texture and flavor we all love.
- Granulated sugar: The sweet foundation of your fudge, providing structure and that classic sugary snap.
- Heavy cream: Adds richness and creaminess, making the fudge melt-in-your-mouth smooth.
- Unsalted butter: Gives the fudge a velvety texture and helps balance the sweetness.
- White chocolate chips: These melt beautifully into the vanilla fudge base, adding a luscious creaminess that mimics custard.
- Marshmallow creme: A secret weapon for that soft, fluffy texture that sets fudge apart from regular chocolates.
- Instant vanilla pudding mix (dry): This helps thicken the fudge and deepen the vanilla flavor, making it taste just like the creamy filling of Boston Cream Pie.
- Vanilla extract: Enhances and rounds out all the vanilla notes, ensuring a rich, aromatic flavor.
- Unsweetened cocoa powder: For the chocolate swirl—a hint of bittersweet contrast to the sweet vanilla base.
- Semisweet chocolate chips: Used for the chocolate glaze, giving a shiny finish and an extra layer of chocolatey goodness.
- Vegetable oil: Helps the chocolate glaze melt smoothly and stay shiny when set.
How to Make Boston Cream Pie Fudge
Ready to dive into making your own batch of this dreamy fudge? I’ll walk you through every step—no rush, just cozy kitchen vibes and tasty results.
- Prep your pan: Line an 8×8-inch square baking pan with parchment paper, making sure to leave about a 2-inch overhang on two opposite sides. This overhang is a handy trick for lifting the fudge out easily once it’s set!
- Make the sugar base: In a large heavy-bottomed saucepan, combine the granulated sugar, heavy cream, and unsalted butter. Turn the heat to medium and stir constantly. Watch as the butter melts and the mixture begins to bubble—a full boil is your goal here.
- Cook to soft-ball stage: Reduce the heat to medium-low and keep stirring for about 7 minutes. This step is crucial because it sets the fudge’s texture. You can test this by dropping a tiny bit into a glass of ice water—it should form a soft, pliable ball. If you happen to have a candy thermometer, aim for 237-239°F. Don’t skip this test, it’s the key to perfect fudge!
- Mix in the white chocolate: Remove the saucepan from heat and stir in the white chocolate chips vigorously until they melt into a smooth, creamy mixture.
- Add marshmallow creme and pudding: Stir in the marshmallow creme until fully combined—this gives the fudge that fluffy, custardy texture. Then add the dry instant vanilla pudding mix and vanilla extract, mixing until everything is thick and uniform.
- Layer the fudge: Pour about two-thirds of your vanilla fudge into the prepared pan and spread it out evenly with a spatula. To the remaining fudge in the saucepan, whisk in the unsweetened cocoa powder until it’s fully combined and smooth.
- Create the chocolate swirl: Drop spoonfuls of the chocolate fudge over the vanilla layer. Grab a knife or a skewer and gently swirl the two together to create that beautiful marbled effect. This not only looks stunning but also gives you a perfect balance of flavors in every bite.
- Let it set: Leave the fudge at room temperature for about 2 hours or until it’s firm enough to cut. Patience here really pays off for the perfect texture.
- Cut into squares: Using the parchment paper overhang, lift the fudge out of the pan and place it on a cutting board. Slice into 16 equal squares—each one a little gem of creamy, chocolatey bliss.
- Make the chocolate glaze: In a microwave-safe bowl, combine the semisweet chocolate chips and vegetable oil. Microwave in 30-second bursts, stirring after each, until the mixture is smooth and glossy. Let it cool for about 15 minutes until it thickens slightly but remains pourable.
- Glaze your fudge: Dip the top of each fudge square into the chocolate glaze, allowing any excess to drip off. Place them chocolate-side up on parchment paper or a wire rack. Repeat with all squares.
- Final set: Let the glaze set at room temperature for about an hour until it’s firm. Now your Boston Cream Pie Fudge is ready to enjoy or share!
Substitutions & Additions
One of the things I appreciate most about this fudge recipe is how adaptable it is. If you’re feeling creative or need to swap an ingredient, here are some ideas to personalize your batch:
- Milk chocolate chips: Swap out white chocolate for milk chocolate in the vanilla fudge base if you prefer a softer, creamier flavor.
- Dark chocolate glaze: For a richer finish, try using bittersweet or dark chocolate chips instead of semisweet for the glaze.
- Flavored pudding mix: Try a chocolate or butterscotch pudding mix for a fun twist on the classic vanilla.
- Extracts: Experiment by adding almond or rum extract in place of vanilla for a unique flavor profile.
- Crunchy additions: Sprinkle chopped toasted pecans or crushed graham crackers on top right after glazing for added texture and flavor. If you love pecan desserts, you’ll adore the crunchy contrast—kind of like in this easy pecan pie recipe I recently shared!
Tips for Success
Making fudge might seem intimidating at first, but with a few handy tips, you’ll nail it every time. Here’s what I’ve learned from my kitchen experiments to help you avoid common pitfalls:
- Use a candy thermometer: While the soft-ball test is great, a thermometer ensures precision. It’s worth the small investment for consistent results.
- Stir constantly: When cooking your sugar mixture, keep stirring to prevent burning or sticking on the bottom of your pan.
- Don’t rush the cooling: Let the fudge set fully at room temperature before cutting or glazing. This helps maintain clean cuts and smooth surfaces.
- Prep your pan well: The parchment overhang is a simple trick that makes removing fudge a breeze—no broken pieces or sticky mess!
- Glaze consistency: If your chocolate glaze is too runny, let it cool a bit longer. Too thick? Warm it gently in the microwave for a few seconds.
- Make ahead: You can prepare the fudge base and swirl it the day before, then glaze just before serving or gifting. Just keep it covered tightly in the fridge overnight.
How to Store Boston Cream Pie Fudge
Storing fudge properly keeps it fresh, soft, and tasty. Here’s my go-to advice for keeping your Boston Cream Pie Fudge at its best:
- Container: Store fudge in an airtight container to prevent it from drying out or absorbing other odors.
- Temperature: Keep it at room temperature if you plan to eat it within a week. For longer storage, refrigerate it to preserve freshness.
- Freezing: Fudge freezes beautifully! Wrap individual squares in plastic wrap and place in a freezer-safe container. Thaw in the fridge overnight before serving.
- Shelf life: Properly stored, fudge lasts up to 2 weeks in the fridge and 3 months in the freezer.
FAQs
Can I use regular chocolate instead of white chocolate chips?
Absolutely! Regular white chocolate chips are recommended for the classic creamy vanilla flavor, but milk or even dark chocolate chips can be used if you want a richer fudge base. Just expect a slight change in taste and texture.
What if I don’t have marshmallow creme? Can I use marshmallows instead?
You can substitute mini marshmallows, but you’ll need to melt them carefully with the butter and cream to get the right texture. Marshmallow creme is smoother and easier to incorporate, making it my preferred choice.
Is it okay to skip the glaze?
Of course! The glaze adds a beautiful chocolate finish and extra flavor, but your fudge will still be delicious without it. You can also drizzle melted chocolate instead of dipping for a lighter touch.
How do I get perfect swirls without mixing the layers too much?
Use a gentle hand and a narrow tool like a skewer or toothpick. Drop spoonfuls of chocolate fudge on top of the vanilla layer, then swirl just a few times—overdoing it can blend the colors too much.
If you love desserts that blend classic flavors with a twist, I bet you’ll also enjoy exploring other treats like the Pineapple Cream Cheese Pound Cake, which is just as rich and comforting in its own way.
And for those days when you want a quick, no-bake indulgence, the No-Bake Brownie Batter Dip is a fun and easy recipe to try alongside your fudge creations.
So next time you’re craving a sweet treat or need a show-stopping gift, give this Boston Cream Pie Fudge a try. It’s a little labor of love that’s sure to bring smiles and warm memories to your kitchen.
Don’t forget to follow us on Pinterest for more delicious recipes and kitchen inspiration!
Boston Cream Pie Fudge
Ingredients
Equipment
Method
- Step 1: Line an 8x8-inch square baking pan with parchment paper, leaving a 2-inch overhang on two opposite sides for easy lifting.
- Step 2: In a large heavy-bottomed saucepan, combine granulated sugar, heavy cream, and unsalted butter. Heat over medium, stirring constantly until butter melts and mixture boils.
- Step 3: Reduce heat to medium-low and continue stirring for about 7 minutes until the mixture reaches the soft-ball stage (237-239°F) or forms a soft ball in ice water.
- Step 4: Remove from heat and stir in white chocolate chips until melted and smooth.
- Step 5: Mix in marshmallow creme until fully combined, then add instant vanilla pudding mix and vanilla extract. Stir until thick and uniform.
- Step 6: Pour about two-thirds of the vanilla fudge into the prepared pan and spread evenly with a spatula.
- Step 7: Whisk the remaining fudge in the saucepan with unsweetened cocoa powder until smooth.
- Step 8: Drop spoonfuls of the chocolate fudge over the vanilla layer and gently swirl with a knife or skewer to create a marbled effect.
- Step 9: Let the fudge set at room temperature for about 2 hours until firm.
- Step 10: Lift the fudge from the pan using parchment overhang and cut into 16 equal squares.
- Step 11: In a microwave-safe bowl, combine semisweet chocolate chips and vegetable oil. Microwave in 30-second bursts, stirring each time, until smooth and glossy. Let cool about 15 minutes until slightly thick but pourable.
- Step 12: Dip the top of each fudge square into the chocolate glaze and place chocolate-side up on parchment paper or wire rack. Repeat for all squares.
- Step 13: Allow the glaze to set at room temperature for about 1 hour until firm. Serve or package as desired.