There’s something truly magical about bite-sized treats that bring a smile to your face — especially when they’re as adorable as these Bunny Oreo Balls. I remember making these with my kids one Easter afternoon, the kitchen filled with laughter, chocolate smudges, and sticky fingers. These little bunny-shaped delights aren’t just irresistibly cute; they’ll quickly become a staple for your holiday gatherings, classroom parties, or anytime you want to spread some joy. The best part? They’re incredibly easy and quick to whip up, making them perfect for last-minute celebrations or casual weekend fun. Let’s hop right in and make some sweet memories together!
Why You’ll Love Bunny Oreo Balls
- Fast: You can have these adorable treats ready in under an hour, including chilling time.
- Easy: No baking required! Just mix, shape, dip, and decorate.
- Giftable: They make perfect, homemade gifts that everyone will adore.
- Crowd-pleasing: Oreo lovers and kids alike will gobble these up — they’re fun and tasty!
Ingredients
For these Bunny Oreo Balls, you’ll need just a handful of ingredients, most of which you probably already have on hand. Here’s the rundown:
- 1 package (14.3 oz) Oreo cookies: The classic cookie base that creates the perfect crumbly texture.
- 8 oz cream cheese, softened: Adds creaminess and helps bind the crumbs into a dough-like consistency.
- 12 oz white chocolate or candy melts: For coating the Oreo balls with a smooth, sweet shell.
- 1/2 cup pink candy melts: To make cute little bunny noses and ears’ accents.
- 1/2 cup black candy melts: For drawing whiskers and eyes with precision.
- Mini marshmallows: These become the bunny ears — just wait until you see how adorable they look!
- Pink sugar sprinkles (optional): Adds a little sparkle and color to the ears.
- Edible black food marker: For the finishing facial details, like eyes and whiskers, if you prefer drawing instead of piping.
Every ingredient plays a special role, and the simplicity of this list is what makes this recipe so approachable. If you love easy no-bake desserts, you’ll find this just as delightful as the No Bake Peanut Butter Pie for effortless sweetness!
How to Make Bunny Oreo Balls
Now, let me walk you through the steps. Don’t worry, I’ll keep things simple and fun — like chatting in the kitchen over a cup of coffee.
Step 1: Prepare the Oreo Mixture
Start by crushing the Oreo cookies to fine crumbs. You can use a food processor for speed, but if you don’t have one, no worries! Just toss the cookies into a sealed plastic bag and crush them with a rolling pin. I love this hands-on method because it feels so satisfying. Next, mix the crumbs with the softened cream cheese in a bowl. Use a sturdy spoon or your clean hands to combine everything until you get a smooth, dough-like mixture. This is what you’ll roll into your bunny balls — the perfect texture to hold together but still soft.
Step 2: Shape the Balls
Roll your mixture into 1-inch balls — about the size of a large marble. Don’t worry if they’re not perfectly round; the chocolate coating will smooth things out. Place them on a baking sheet lined with parchment paper. Pop them into the fridge for about 30 minutes. This step firms them up, making it easier to dip in chocolate without losing their shape.
Step 3: Coat with Chocolate
While the balls chill, melt your white chocolate or candy melts in a microwave-safe bowl. Heat in 20-second bursts, stirring in between to keep things silky smooth. Once melted, dip each Oreo ball into the chocolate using a fork or a dipping tool. I like to gently tap the fork on the bowl’s edge to remove excess chocolate — no one wants a dripping bunny! Place the coated balls back onto the parchment paper and let them set. You can speed this up by placing them in the fridge.
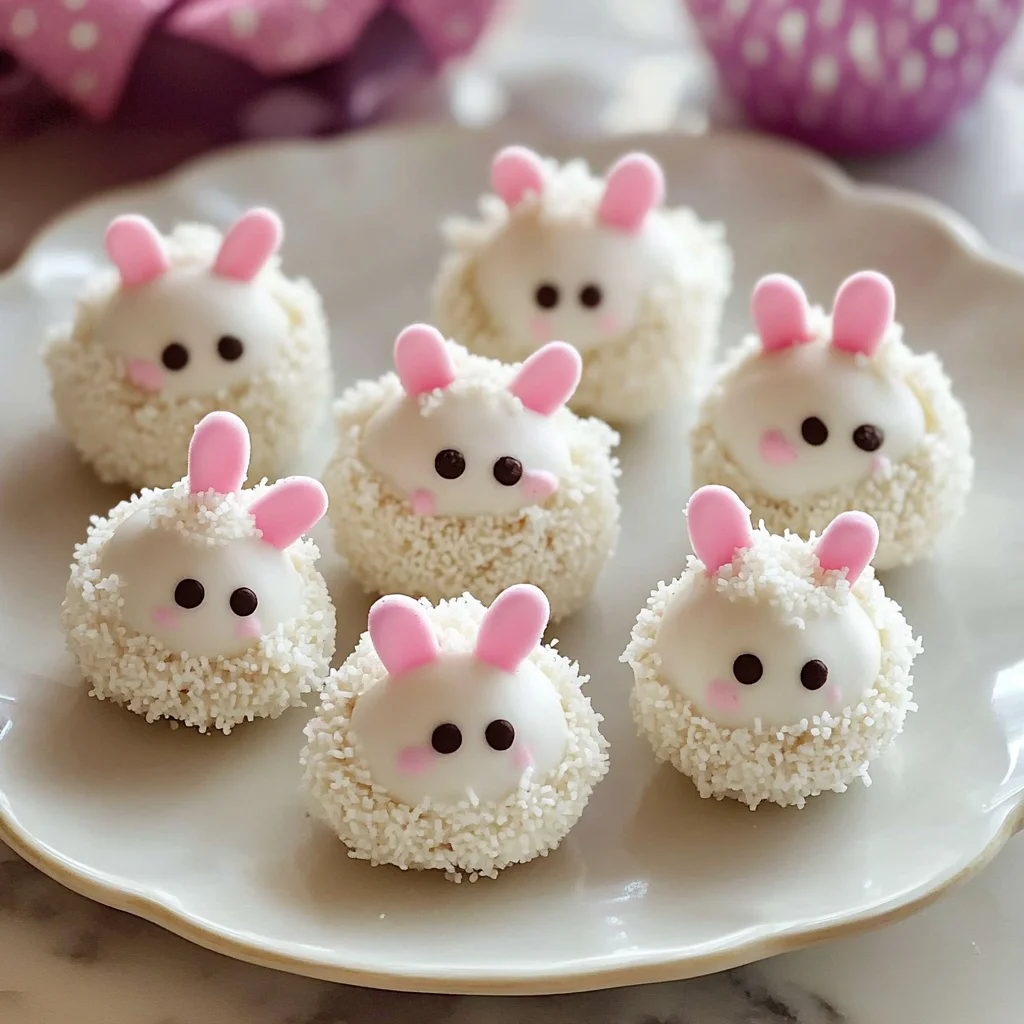
Step 4: Decorate as Bunnies
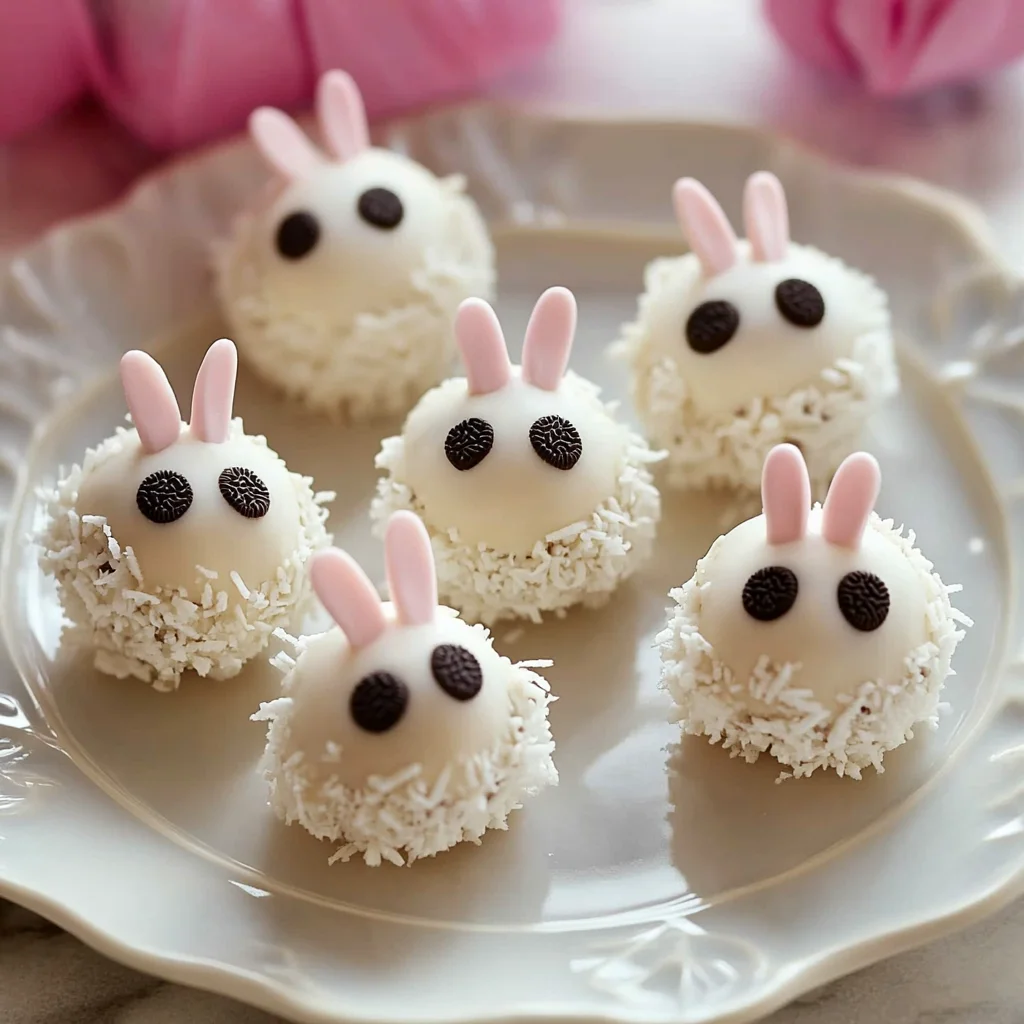
Now, the fun part! Cut mini marshmallows diagonally to make the bunny ears. Dip the sticky sides into pink sugar sprinkles for a cute, sparkly touch. Attach the ears to each Oreo ball while the chocolate coating is still slightly wet — this acts like glue. Next, melt the pink and black candy melts separately. Use a piping bag or toothpick to add the bunny’s nose and whiskers with the pink and black melts. For eyes, you can either pipe with black candy melts or use an edible black food marker for extra precision. I like to keep a damp cloth nearby to wipe any small mistakes — it happens to the best of us!
Step 5: Final Touches
Let the decorated bunnies sit until all the chocolate and candy melts are completely set. This usually takes about 15-20 minutes at room temperature, or you can chill them in the fridge. Once set, they’re ready to be admired and enjoyed. These treats not only taste incredible but also make any dessert table look festive and inviting.
Substitutions & Additions
Feel free to get creative with your Bunny Oreo Balls! Here are some ideas to customize or adjust the recipe based on what you have or your personal tastes:
- Cookie base swap: Instead of Oreos, try chocolate sandwich cookies with different flavors like mint or birthday cake for a twist.
- Cream cheese alternatives: For a lighter option, you can substitute half the cream cheese with mascarpone or even Greek yogurt, though the texture will be a bit different.
- Chocolate coatings: Use milk or dark chocolate melts if you prefer a richer flavor. You can also drizzle contrasting chocolate colors for a cute marbled effect.
- Decorations: Instead of marshmallow ears, try small fondant shapes or candy-coated almonds for ears. Colored sugar or edible glitter can jazz up the look even more.
- Flavor add-ins: Mix a teaspoon of vanilla extract or almond extract into the Oreo and cream cheese mixture for extra depth.
These ideas let you personalize your treats and even tie into themes or holidays. If you like no-bake treats with creative flair, you might also love the layered goodness of the No Bake Brownie Cheesecake Cups — another easy crowd-pleaser.
Tips for Success
Making Bunny Oreo Balls is pretty forgiving, but here are some tips I’ve picked up to help you nail it perfectly every time:
- Softened cream cheese: Make sure your cream cheese is softened to room temperature. This makes mixing easier and helps create a smooth dough.
- Don’t over-crush Oreos: You want them finely crushed but not powdery. A little texture helps the balls hold together.
- Chill well: Refrigerate the balls before dipping and after coating. This prevents cracking and keeps shapes intact.
- Use parchment paper: Prevents sticking and makes cleanup a breeze.
- Work quickly when attaching ears: The chocolate needs to be slightly wet for sticking. If it hardens, gently warm the coating or use a dab of melted chocolate as glue.
- Prep ahead: You can make the Oreo balls a day ahead, store them in the fridge, and do the chocolate coating and decorating the next day for a stress-free process.
If you enjoy prepping treats ahead, you might also want to check out the tips in my Pineapple Cream Cheese Pound Cake recipe, which is great for make-ahead baking.
How to Store Bunny Oreo Balls
After all the fun of making and decorating these little bunnies, you want to keep them fresh and delicious. Store your Bunny Oreo Balls in an airtight container in the refrigerator. They’ll keep well for up to 5 days. Because they contain cream cheese, refrigeration is necessary to maintain freshness and safety.
If you want to prepare them even earlier, you can freeze the uncoated Oreo balls for up to a month. Just thaw them in the fridge before dipping and decorating. Once coated and decorated, it’s best to store them refrigerated to keep the candy melts looking their best and prevent condensation.
These storage tips ensure you’ll have a delightful treat ready whenever the craving hits or when guests arrive unexpectedly.
FAQs
Q: Can I use regular cream cheese or should it be low-fat?
A: I recommend full-fat cream cheese for the best texture and flavor. Low-fat versions can change the consistency and might make the balls less creamy.
Q: What if I don’t have candy melts? Can I use regular chocolate?
A: Absolutely! White chocolate chips or baking chocolate works well. Just melt gently to avoid burning, and if needed, add a little shortening or coconut oil to keep the chocolate smooth and easy to dip.
Q: How do I fix cracked chocolate coating?
A: Cracking often happens if the balls are too cold or the chocolate cools too fast. Try letting the balls sit at room temperature for a few minutes before dipping, and work in small batches to keep the chocolate warm and smooth.
Q: Can I make these bunny shapes without marshmallow ears?
A: Yes! If you’re short on marshmallows, try using small candy pieces or even cut fondant shapes for the ears. Or keep it simple with just the piped faces — they’re adorable either way.
If you want even more inspiration for easy no-bake and festive treats, don’t miss the variety of recipes over at Recettia’s collection, where you’ll find everything from sweet to savory delights.
Ready to hop into the kitchen and make these charming Bunny Oreo Balls? They’re fun to create, delicious to eat, and sure to bring a cheerful vibe to any occasion. Plus, they’re a wonderful way to share a homemade treat with loved ones – perfect for gifting or party favors!
Happy baking (or rather, no-baking!), and don’t forget to check out more cozy recipes like the No Bake Brownie Batter Dip for your next sweet craving.
For more fun recipes and kitchen inspiration, be sure to follow our Pinterest page. You’ll find plenty of ideas to brighten your cooking and baking adventures!
Delightfully Cute & Easy Bunny Oreo Balls
Ingredients
Equipment
Method
- Step 1: Crush Oreo cookies into fine crumbs using a food processor or a rolling pin in a sealed bag. Mix crumbs with softened cream cheese until smooth and dough-like.
- Step 2: Roll mixture into 1-inch balls and place on a parchment-lined baking sheet. Refrigerate for about 30 minutes to firm up.
- Step 3: Melt white chocolate or candy melts in microwave-safe bowl in 20-second bursts, stirring until smooth. Dip each Oreo ball into melted chocolate, tap off excess, and place back on parchment. Chill to set.
- Step 4: Cut mini marshmallows diagonally for ears, dip sticky sides into pink sugar sprinkles if using, and attach to still-wet chocolate coating on Oreo balls.
- Step 5: Melt pink and black candy melts separately. Use a piping bag or toothpick to add bunny noses and whiskers with pink and black melts. Use black candy melts or an edible black food marker to create eyes.
- Step 6: Allow decorated bunnies to set fully at room temperature for 15-20 minutes or chill to speed up. Serve and enjoy your charming treats!