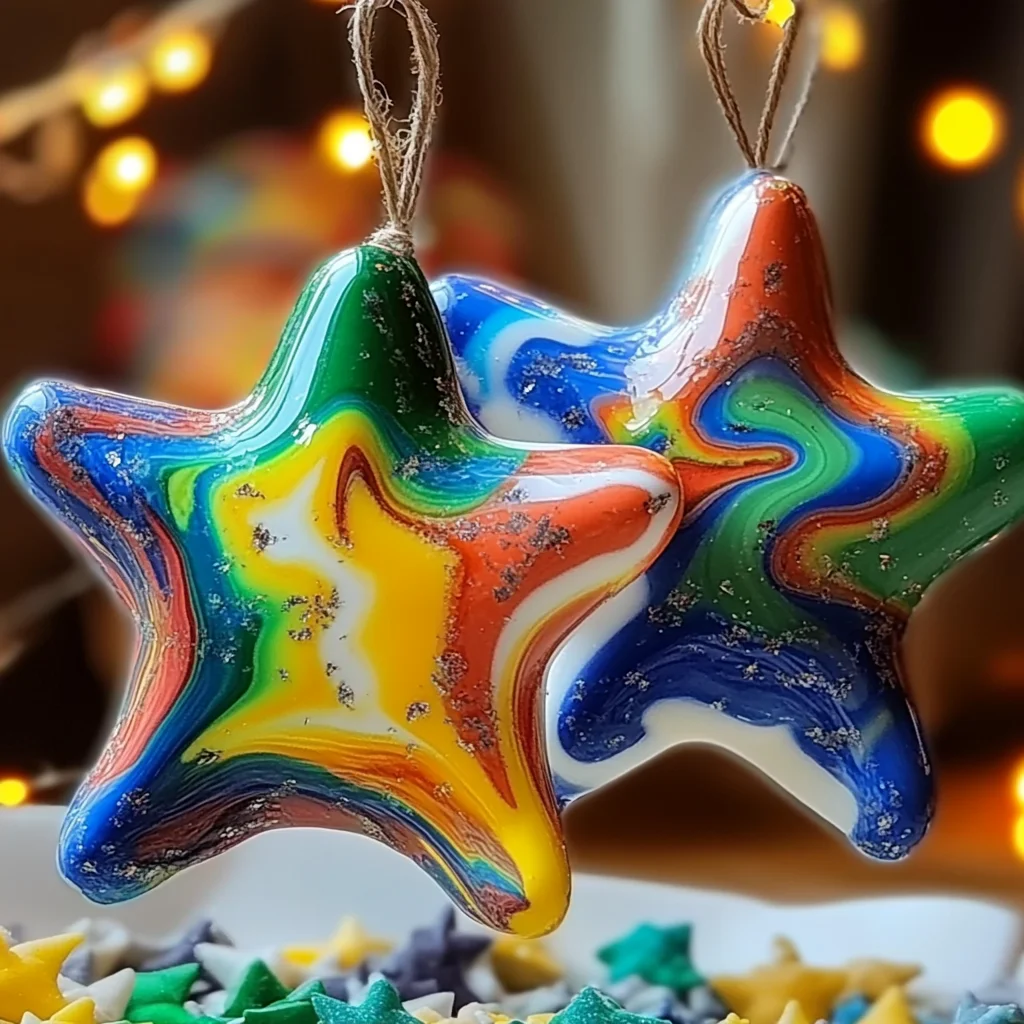
Oh, friend, do you remember those days as a kid when a fresh box of crayons felt like a treasure chest of endless possibilities? The vibrant colors, the waxy scent – pure magic! Well, today we’re tapping into that nostalgic joy with a craft that’s as simple as it is stunning: Melted Crayon Star Decorations. This isn’t just a project; it’s a little slice of childhood happiness you can create and share. It’s perfect for adding a pop of color to your windows, a charming touch to your holiday tree, or even as unique, handmade gift toppers. And honestly, it’s just as comforting and rewarding as whipping up a batch of Pumpkin Banana Loaf on a chilly afternoon. Let’s make some colorful memories, shall we?
You’re going to love how easy, quick, and utterly delightful these melted crayon stars are. Get ready to transform those forgotten crayon nubs into something truly special!
Why You’ll Love Melted Crayon Star Decorations
- Fast: From crayon shavings to dazzling stars in under an hour!
- Easy: No fancy skills or tools required – perfect for all ages (with a little adult help).
- Giftable: These make the sweetest, most personal little gifts or holiday package adornments.
- Crowd-Pleasing: Everyone, from toddlers to grown-ups, will be charmed by these colorful creations.
Ingredients
Gather ’round, my crafting buddy! Here’s what you’ll need to conjure up some melted crayon magic:
- Crayons: All those broken bits and forgotten colors in the bottom of the crayon box? Now’s their time to shine! The more variety, the better.
- Wax Paper: Your trusty companion for melting magic. It holds the crayon shavings perfectly.
- Parchment Paper: To protect your iron, naturally! You’ll sandwich your wax paper creation between two sheets of this.
- Baker’s Twine: For hanging your masterpieces. You can also use ribbon or fishing line if you prefer.
- Scissors: For cutting out those perfect shapes.
- Crayon Sharpener or Knife: To get those tiny, melt-ready shavings. A vegetable peeler works wonders too!
- Iron (with adult supervision): The magic wand that brings the colors to life. Make sure an adult is handling this part!
- Star Stencil or Cookie Cutter: Because stars are just so dreamy and festive! But feel free to use any shape you love.
- Hole Punch: For making them hangable. A standard single hole punch is perfect.
How to Make Melted Crayon Star Decorations
Alright, let’s get those creative juices flowing! Here’s your simple, step-by-step guide to making these beautiful stars:
- Prep Your Crayons: First things first, you’ll need to remove all the paper wrappers from your crayons. This can be a fun little task for younger helpers! I find a small knife or even just peeling it off works best.
- Shave the Rainbow: Next, shave your crayons into small bits. A crayon sharpener is fantastic for this, giving you lovely, fine curls. If you don’t have one, a knife (always with adult supervision, please!) or a vegetable peeler works great too. This part is surprisingly satisfying! You want small shavings, not chunks, for even melting.
- Design Your Palette: Lay down a sheet of wax paper. Now, spread your crayon shavings evenly onto one half of the wax paper. Don’t be shy with your color combos! Mix and match, layer them, or create a gradient. This is where your inner artist really comes out!
- Seal the Deal: Carefully fold the other half of the wax paper over the shavings. Gently press around the edges to seal them, creating an enclosed little packet. You don’t want any crayon bits escaping!
- Parchment Paper Sandwich: Place your wax paper packet between two sheets of parchment paper. This is super important to protect your iron and ironing board from any wax residue.
- Melt the Magic: With adult supervision, grab your iron. Set it to a low heat setting (no steam!). Gently glide the iron over the top sheet of parchment paper, moving it constantly. You’ll see the crayon shavings start to melt and blend together like magic. Keep ironing until all the shavings have melted into a smooth, colorful sheet.
- Cool Down Time: Once melted, carefully remove the parchment paper sandwich from the iron. Set it aside and allow the melted crayon wax to cool and harden completely. This usually only takes about 10-15 minutes. You can even pop it in the fridge for a few minutes to speed things up!
- Shape Your Stars: Now for the fun part! Once the wax is hard, peel off the top layer of parchment paper (and the wax paper, if it sticks). Using your star stencil or cookie cutter, trace and carefully cut out your star shapes from the hardened crayon wax. A craft knife is great for intricate shapes, while a cookie cutter simply presses down.
- Punch a Hole: Take your hole punch and make a small hole at the top of each star. This is how you’ll hang them!
- Thread and Hang: Finally, thread a piece of baker’s twine through the hole of each star. Tie a loop for hanging. And there you have it – your beautiful, homemade melted crayon star decorations, ready to sparkle!

Substitutions & Additions
The beauty of this craft is how adaptable it is! Don’t feel limited to just stars or specific colors:
- Shape Shifters: While stars are classic, you can use any cookie cutter! Think hearts for Valentine’s Day, leaves for fall, ghosts for Halloween, or even little gingerbread men for Christmas.
- Sparkle & Shine: For extra dazzle, sprinkle a little glitter in with your crayon shavings before you fold the wax paper. The glitter will melt beautifully into the wax, creating a shimmering effect.
- Ribbon & Twine: Instead of baker’s twine, try festive ribbon, clear fishing line for a floating look, or even thin metallic wire.
- Layered Looks: Experiment with layering different colors of shavings for a more complex, multi-dimensional look. Try putting a thin layer of one color, then a heavier layer of another, or even creating stripes!
- Suncatchers: Make them a bit larger and hang them in a sunny window for gorgeous, stained-glass-like DIY Suncatcher decorations.
Tips for Success
Want to make sure your melted crayon stars turn out absolutely perfect? Keep these friendly tips in mind:
- Low and Slow with the Iron: The most common mistake is using an iron that’s too hot. Start with the lowest setting and slowly increase if needed. Too much heat can burn the wax or cause it to spread too quickly and unevenly.
- Even Shavings are Key: Try to get your crayon shavings as uniform in size as possible. This ensures they melt evenly and create a smooth, consistent sheet of color.
- Don’t Rush the Cooling: Let the wax cool completely before you try to cut out your shapes. If it’s still warm, it will be soft and sticky, making clean cuts difficult. Patience is a virtue here!
- Clean Your Iron (Just in Case!): Even with parchment paper, sometimes a tiny bit of wax can sneak through. I always like to give my iron a quick wipe with an old cloth after projects like this, just to be safe.
- Prep Ahead: If you’re doing this with kids, you can pre-shave a bunch of crayons. That way, they can jump straight into the fun part of arranging colors and ironing!
And speaking of easy and fun projects, if you’re ever looking for another no-fail, delightful treat that requires minimal fuss and maximum yum, you’ve got to check out our No-Bake Chocolate Lasagna. It’s a kitchen adventure that ends in pure deliciousness!
How to Store Melted Crayon Star Decorations
These little beauties are pretty sturdy, but since they’re made of wax, a little care goes a long way!
- Keep Them Flat: Store your stars flat, rather than piled on top of each other. This prevents them from bending or breaking.
- Layer with Protection: If you need to stack them, place a sheet of wax paper or tissue paper between each layer to prevent sticking, especially if your storage area might get a little warm.
- Cool and Dry is Best: Like any wax product, direct sunlight or very warm temperatures can cause them to soften or even melt. Keep them in a cool, dry place – a closet shelf or a decorative box works perfectly.
- Shelf Life: As long as they’re stored properly, these melted crayon stars can last indefinitely, bringing cheer year after year!
FAQs
Got a few questions bubbling up? Let’s tackle them!
Q: Can I use different shapes other than stars?
A: Absolutely! Any metal cookie cutter will work perfectly. Think hearts, circles, trees, even animals! The sky’s the limit for your creativity.
Q: What if my iron starts getting crayon wax on it?
A: This usually means your parchment paper isn’t fully covering the wax paper packet, or the heat might be a little too high. Double-check your setup and ensure all edges are sealed. If wax does get on your iron, you can often clean it by ironing over an old towel or a paper bag while it’s warm.
Q: Is this craft safe for kids?
A: Yes, with adult supervision! Younger children can help with peeling wrappers and arranging crayon shavings, while an adult should always handle the sharpener/knife and the hot iron. It’s a fantastic way to engage kids in a creative, hands-on activity!
Q: Can I add glitter or other embellishments?
A: You bet! Glitter adds a beautiful sparkle. Sprinkle it in with the crayon shavings before melting. Small, heat-safe beads or sequins could also be embedded, but test a small piece first to ensure they don’t melt or scorch.
For more crafty ideas and delicious recipes, be sure to follow us on Pinterest!
Melted Crayon Star Decorations
Ingredients
Equipment
Method
- Step 1: Prep Your Crayons: Remove all paper wrappers from your crayons. A small knife or simply peeling works best.
- Step 2: Shave the Rainbow: Shave crayons into small bits using a crayon sharpener, knife (with adult supervision), or vegetable peeler. Aim for fine curls, not chunks, for even melting.
- Step 3: Design Your Palette: Lay down a sheet of wax paper. Spread crayon shavings evenly onto one half. Mix and match colors, layer them, or create gradients.
- Step 4: Seal the Deal: Carefully fold the other half of the wax paper over the shavings. Gently press around the edges to seal them, creating an enclosed packet.
- Step 5: Parchment Paper Sandwich: Place your wax paper packet between two sheets of parchment paper to protect your iron and ironing board.
- Step 6: Melt the Magic: With adult supervision, set an iron to a low heat setting (no steam). Gently glide the iron over the top sheet of parchment paper, moving it constantly, until all crayon shavings have melted into a smooth, colorful sheet.
- Step 7: Cool Down Time: Carefully remove the parchment paper sandwich and set it aside. Allow the melted crayon wax to cool and harden completely (about 10-15 minutes, or speed up in the fridge).
- Step 8: Shape Your Stars: Once the wax is hard, peel off the top layer of parchment paper. Using your star stencil or cookie cutter, trace and carefully cut out your star shapes from the hardened crayon wax.
- Step 9: Punch a Hole: Use a hole punch to make a small hole at the top of each star for hanging.
- Step 10: Thread and Hang: Thread a piece of baker's twine through the hole of each star and tie a loop for hanging. Display your beautiful, homemade decorations!